Jump to:
Live Dashboard is your command center for observing and handling calls, users, and departments, providing you with information about calls traffic, users' activity, and groups load.
 If you activate landscape orientation on your mobile device, Live Dashboard will function much like the desktop version but with a different stacking of windows and elements. In portrait orientation, however, the interface is rather different and may work better for you. It will certainly require less scrolling. Also, if you reduce the the size of the Live Dashboard window in the Desktop version the layout and controls will change to look like the mobile version.
Access Live View from the Analytics menu on the Welcome Dashboard screen (or from any other screen you opened).

The mobile browser version supports three views (compared to four in the desktop version). Tap the Change dashboard view button, at the top-right corner, to switch between views.

Users View #1 and Users View #2 are similar except that they provide different information about calls in the Calls Tab.
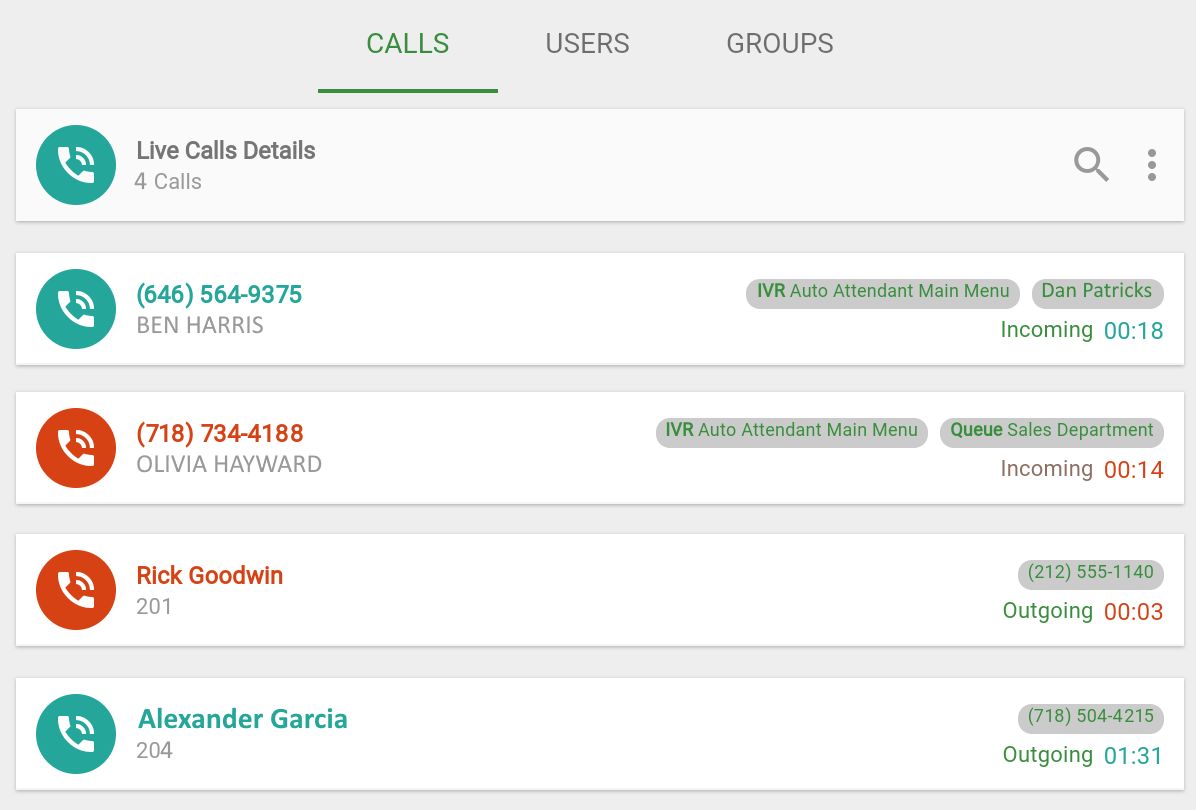
View #1 shows the total number of calls (active+holding). The call details on the right side show the flow for each call (it's progression through the phone system's menus, users, and queues). The direction of the call (incoming or outgoing) is also indicated.

View #2 shows a separate count for active and holding calls. The call details on the right side show the destination of the call (phone number, user, or group/queue).

The filter button at the bottom right corner of the window gives you control over the amount of information displayed in the window.
You can apply more than one filter. For example, with the Groups and Users by Status filters, you can display only those users who are available to take calls in a specific group. Tap Save to apply one or more filters. Tap Clear to remove all applied filters.

When you apply any filter the filter button will be marked with a red dot to remind you that the information you see is filtered out.
Users View
This is the default view with three different tabs for Calls, Users, and Groups.

Calls Tab
There are two types of calls shown in this tab. Holding calls (or those that are still ringing) are marked by a red - these are calls that have not been answered yet. Answered Calls - (also referred to as active calls) are marked by a green - these are calls that have been answered by agents.
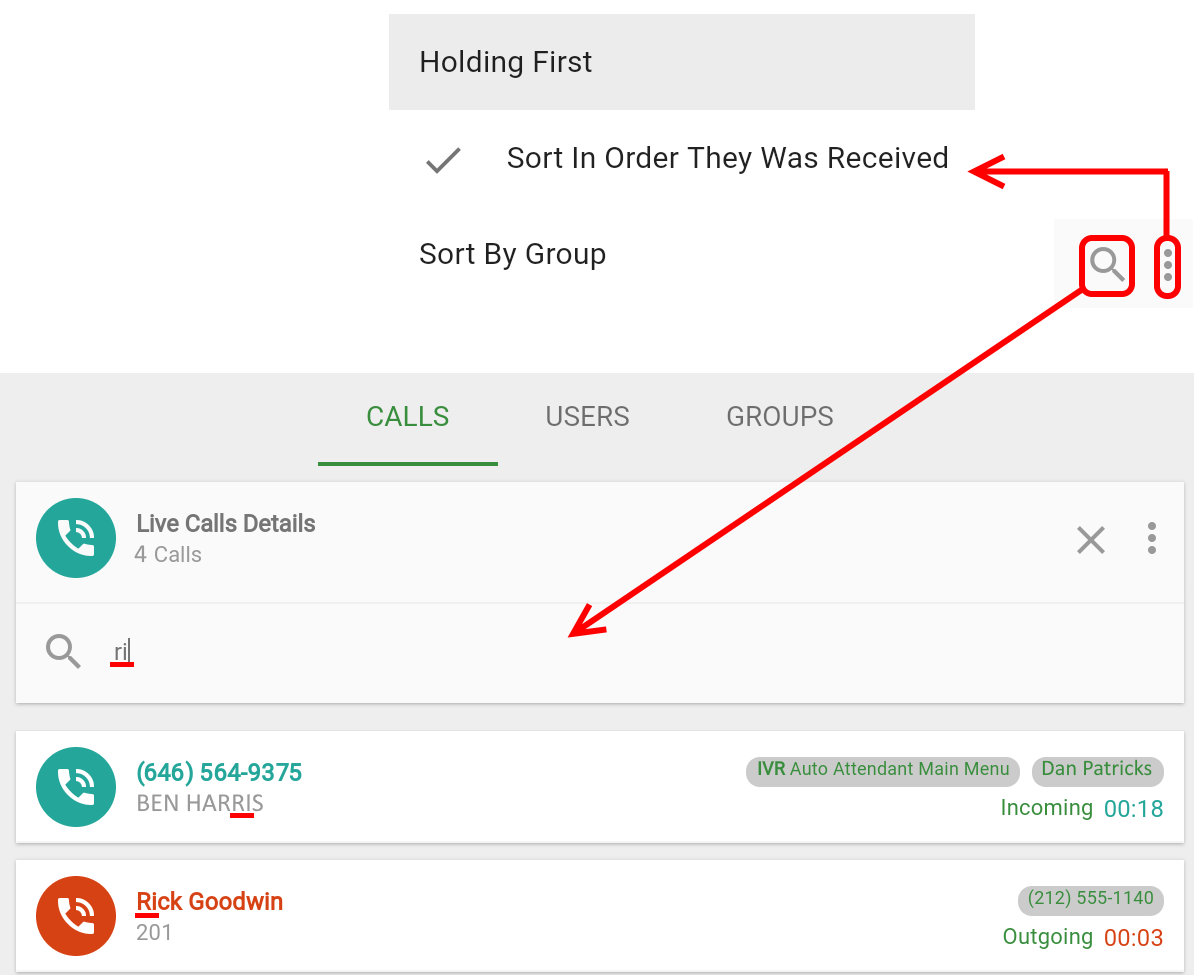
Tap the menu on the top-right corner to display calls sorting options:
- Holding First - will sort the list so that calls on hold will be displayed at the top, while the answered calls will be displayed below.
- Sort in Order they were Received - displays the calls in chronological order.
- Sort by Group- will sort the calls according to groups (sorting the groups themselves alphabetically).
Looking closer at at each call we can see several items of information:

- On the left there is a red indicating if the call is holding (or ringing) or green one if the call has been picked up by a user.
- Next on the left we see the caller's phone number and name. It will be either an external number for an incoming call or an internal extension for an outgoing or internal call.
- On the top-right we see the call flow details. These are indications of the path the call traveled in the phone system.
- For incoming calls you will usually see that the call is initiated at the IVR Auto Attendant Main Menu, where a user
It can than move on to a user (or his extension if it was dialed directly) - or to a group (referred to as a queue)
  .
. - For outgoing call you will simply see the destinations's phone number -
 .
.
- For incoming calls you will usually see that the call is initiated at the IVR Auto Attendant Main Menu, where a user
- Next on the bottom-right is another indication if the call is incoming or outgoing and a counter of the calls's total duration since it was initiated.
Call actions works the same in Groups View (see below).


Hang Up - self explanatory. You will be asked to confirm you want to hang up the call and once you do the call will be disconnected.

Redirect - this is one of the most important tools of the Live Dashboard, allowing you to distribute calls, handle overflow, and match the right users with the right customers. When you tap the button, it will open a window with two tabs where you can redirect the call to either groups or users. Select an agent or a queue in the appropriate tab and tap Redirect Call.
- USERS - the availability status for each user is shown and is identical to the statuses explained in the users tab (see below), except that the On Call status is without an indication of the caller's phone number.
 You can drag the list of users upward to show additional users!
- DEPARTMENTS - the number of holding and live calls are indicated next to each department to let you asses call load before redirecting the selected call. You can drag the list of department upward to show additional departments!

Join Call - click this to listen to a call by joining the conversation. A prompt will ask you to approve this and then your administrator phone line will ring. When you pick up, a conference call will be created between yourself, the user, and the person he is talking to. Mute your microphone to just listen to the conversation.
 For this feature to work, a phone line needs to be defined and associated with the Analytics account currently logged in otherwise you will see a "You do not own any phone line" error.
It is also possible to join a call using a dial code. You can read more about this here.
Filters
There are two filters that are relevant in this view.


Users Tab
The Users Tab provides an overview of user's extensions and availability status. Notice that if a user has more than one extension each will appear separately, as in the case of Alexander Garcia.
The possible statuses are:
| Available | The user is logged in and is available to take calls. | |
On Call | The user is handling a live call. | |
| If the call is incoming the caller's name will be displayed below the status. |  | |
| If the call is outgoing the user's name will be displayed below the status. |  | |
| Ringing | The agent's phone is ringing. He is yet to answer. | |
| Do Not Disturb | This is a notice activated by the user from his TeleConsole account suggesting he is occupied with another activity. Please see our TeleConsole user guides for more information. | |
| Unavailable | The user is logged off the TeleConsole and is not available to take calls. If a call is directed to this user the number will be displayed under the status. | |

Tap the menu on the top-right corner to display users sorting options

- A to Z - sorts the users alphabetically.
- Waiting for calls First - sorts the users by the ones who are waiting to answer calls first. Available users will be shown at the top of the list, while the ones who are busy with calls will be placed lower.
- Sort by Group - sorts the users by the number of groups they belong to. For example a user belonging to three groups will be placed higher than a user belonging to only one group.
- None - sorts the users into blocks of number of users they are assigned to. For example at the top of the list will be all the agents belonging to four groups, next to three queues, etc. The users are sorted alphabetically within these groups.

Filters
There are two filters that are relevant to the users tab:
- Filter Users - check the users that you want to be displayed in the users list.
This only affects the list of users and nothing else. Calls with users who were filtered out will still be displayed in the calls tab regardless.
- Filter User by Status - select one of the options here to filter specific agents based on their availability status.
- Available for calls - the users list will only show users who are not talking to customers or having their phone ring by customers.
- On call - the users list will only show users who are currently talking to customers.
- Logged out from all groups - self-explanatory. The list will only show user who are not logged in to any group.
- Available for calls - the users list will only show users who are not talking to customers or having their phone ring by customers.

Groups Tab
The Groups Tab provides details of the number of holding and live calls for each department. The sorting and filtering options are especially useful here for getting an overview of the the call load for your entire phone system or call center.

 The terms "Departments" and "Groups" are interchangeable here.
Tap the menu on the top-right corner to display queues sorting options:
- A to Z - sorts the groups alphabetically.
- Most holding calls - sorts the groups by the ones with the most unanswered calls.
- Most agents available - sorts the groups by the ones that have the most users that have not yet answered any calls.
- Priority - sorts the groups by their priority rankings. Priority rankings are assigned by an administrator. If automatic distribution is used calls will be assigned to the groups with higher rankings first.
Tap the magnifying glass to search for queues by name. Non matching results will be hidden. To display all the queues again tap X.

Filters
There are two filters that are relevant to the Groups Tab:
- Filter Groups - check the groups that you want displayed. This allows you to focus on the more active groups or ones that need specific attention.

- Filter Queues By Status - choose to display groups that have Users on Call(s) in them (either active or holding), or groups that have No Users on call(s) (not even one user is handing or receiving a call). During heavy call volume, this allows you to redirect calls to groups with no activity.

Groups View
In this view you can see holding and active calls for each group separately. There are no tabs in this view, but It is a useful view when you need to focus on the traffic of particular groups instead of seeing all the calls at once as they appear in the calls tab (see above).
The number of holding calls, live calls, and agents (which for our purposes is the same as users) who are assigned to the group are indicated. With this you can easily estimate the status of the groups and its overflow potential.
Tap the left or right arrow to switch to another group.

For each call the name and number of the caller are given on the left side. The duration of the call (since it was placed) is given on the right. The duration and number of the caller are given in green if the call has been answered (live) or red if it is holding.
If the call was picked up the name of the user who took it is shown under the duration of the call.
If the call is holding the name of the group and the name of the user that the call is ringing for (according to the system distribution rules) are eahc displayed under for a moment under the duration of the call.

Notice that while there are 5 agents assigned to the group, it doesn't necessarily mean that all of them are available to take calls. They may have activated Do Not Disturb mode or logged out of the group on their TeleConsole account.
Call Actions
Tap any call to access call actions for it. Call actions here work just the same as in the Users view (see above).

Four filters apply to this view except (Calls by status and Calls by Direction do not apply). See the User view above for more details on each filter.
- Filter Groups - you can switch only between the groups selected here. If you check only one group, the arrow buttons will not have effect until you clear the filter (only the checked group will be show).
- Filter Users - users that are not checked will be excluded from the displayed agent count for each group. The filter has no other effect. Calls for unchecked users will still be show in a group. So for example if a group has 5 users and you check only one that belongs to it, that agent count will indicate only one agent. Still if any of the other agents receives a call in the group it will be shown and can be handled with call actions.
- Filter Groups by Status - only groups with the relevant selection (users who are on calls or no users on call) will be available for switching between with the arrows. If you select one of the choices and there are no groups with such calls an empty box is displayed until you clear the filter.
- Filter Users by Status - the displayed agent count for each group will reflect the selection here. The filter has no other effect. Calls for users with unchecked statuses will still be show in a group. So for example if a group has 5 users and you check "On call", that agent count will indicate the number of agents handling calls in group. Still if any of the other agents receives a call in the group it will be shown, regardless of the selected status, and can be handled with call actions.