- Usage and Types of Audio Files
- Listening to Audio Files
- Creating New Sound or Music
- Audio Files Settings---
- Adding New Audio Files
Usage and Types of Audio Files
The Audio files page lets you record, add, generate, and manage sound files, music sequences, greetings, and announcements that can be used by various features of the phone system, most commonly with IVR menus and music on hold.
Access it from the side navigation menu under Voice Features>Audio Files.
The page has two tabs – Sound Files and Music on Hold. A sound file is a single recorded or generated audio, while a music on hold is a sequence of up to ten files.
Clicking  on the Starred column will add a sound file or music to the home page Starred Features panel for fast access. On either tab, you can delete sound or music files by checking them and clicking
  , but be aware that this action cannot be undone.
Select  to download a CSV file of existing sounds or music files showing a file ID, name, description, and an indication if the file was created by uploading it or not (True or False), and if it was shared or not.
Use  to search for specific file(s) by name, description, or the file ID from the CSV file (you can also search with the Global Search box on the top bar, but it will find pages and items matching your search term from across the Admin Center).
Listening to Audio Files
The Sound Files tab has audio players next to each file to play or pause it(  /
/ ). You can also drag the playhead around to skip backward or forward and change or mute the playback volume with
  . Click
  to Download the file in WAV format or change the Playback Speed.

On the Music on Hold tab, select  /
/ to play/pause the music's audio file in a sequence (a greyed-out button means no sound files have been added to the sequence). To view and manage the sequence, select the music on hold and expand its Music Files list (see below).

Creating New Sound or Music
You can add new audio files by selecting ADD SOUND/ADD MUSIC under the relevant tab or from the Voice Features Shortcut menu. Enter the name of the music or sound file and select CREATE.
The Audio Files Settings screen will open, where you can expand the Music File(s) options and select Add Sound (Sound Files tab) or the  button (Music on Hold tab) to upload, record, or use text-to-speech to add new audio files. Select Save Sound to keep the new audio.
You can use existing sound files in a Music on Hold sequence, but not vice versa.
You can also have the system call you to record a sound file. To do so, select  and Record From Phone on the Sound Files tab, enter the Number to call, and select Call me. Your phone line will ring and you will be prompted to record the audio file and press # when finished. The recorded file will be named based on the date and time of the call.

Audio Files Settings
Selecting or adding sound or music files shows their settings options with two expandable categories. When making changes, you need to SAVE each category separately.
The arrow buttons let you select the next or previous sound without having to go back to the main music or sounds pages.

Music Info
- Name: Self-explanatory. Names that are generated by the system (like when you call to record a sound) are based on the date and time the audio file was created.
- Description: Self-explanatory. This is optional.
- Play In Order (Music on Hold tab): Select how the music sequence will play – In Order (in a sequence) or Random order.

Music File(s)
The Sound Files tab shows the current audio file and an audio player. You can select to Change the file (or Add Sound if a sound file has not been previously added) to record, upload, or generate a different file with AI voice (see next).

The Music on Hold tab has a sequence of ten music tracks (audio files). Select Replace Audio ( ) from a track's mini-menu to change it or to add a new audio file to any empty slot.
If you delete any track with the Remove Audio option, the list will not shift upward and there will be an empty slot in the sequence. This system will skip this empty slot when the sequence is played.

You can add or replace music sequence tracks by recording, uploading, generating them with AI text-to-speech. You can also select existing audio files from the Library.
Adding New Audio Files
When adding or changing a sound File, you will see three tabs to Upload, Record, and generate text-to-speech with AI Voice (Music on Hold sequence tracks also have an option to select an existing file from the Library).
Text-to-speech is discussed next.
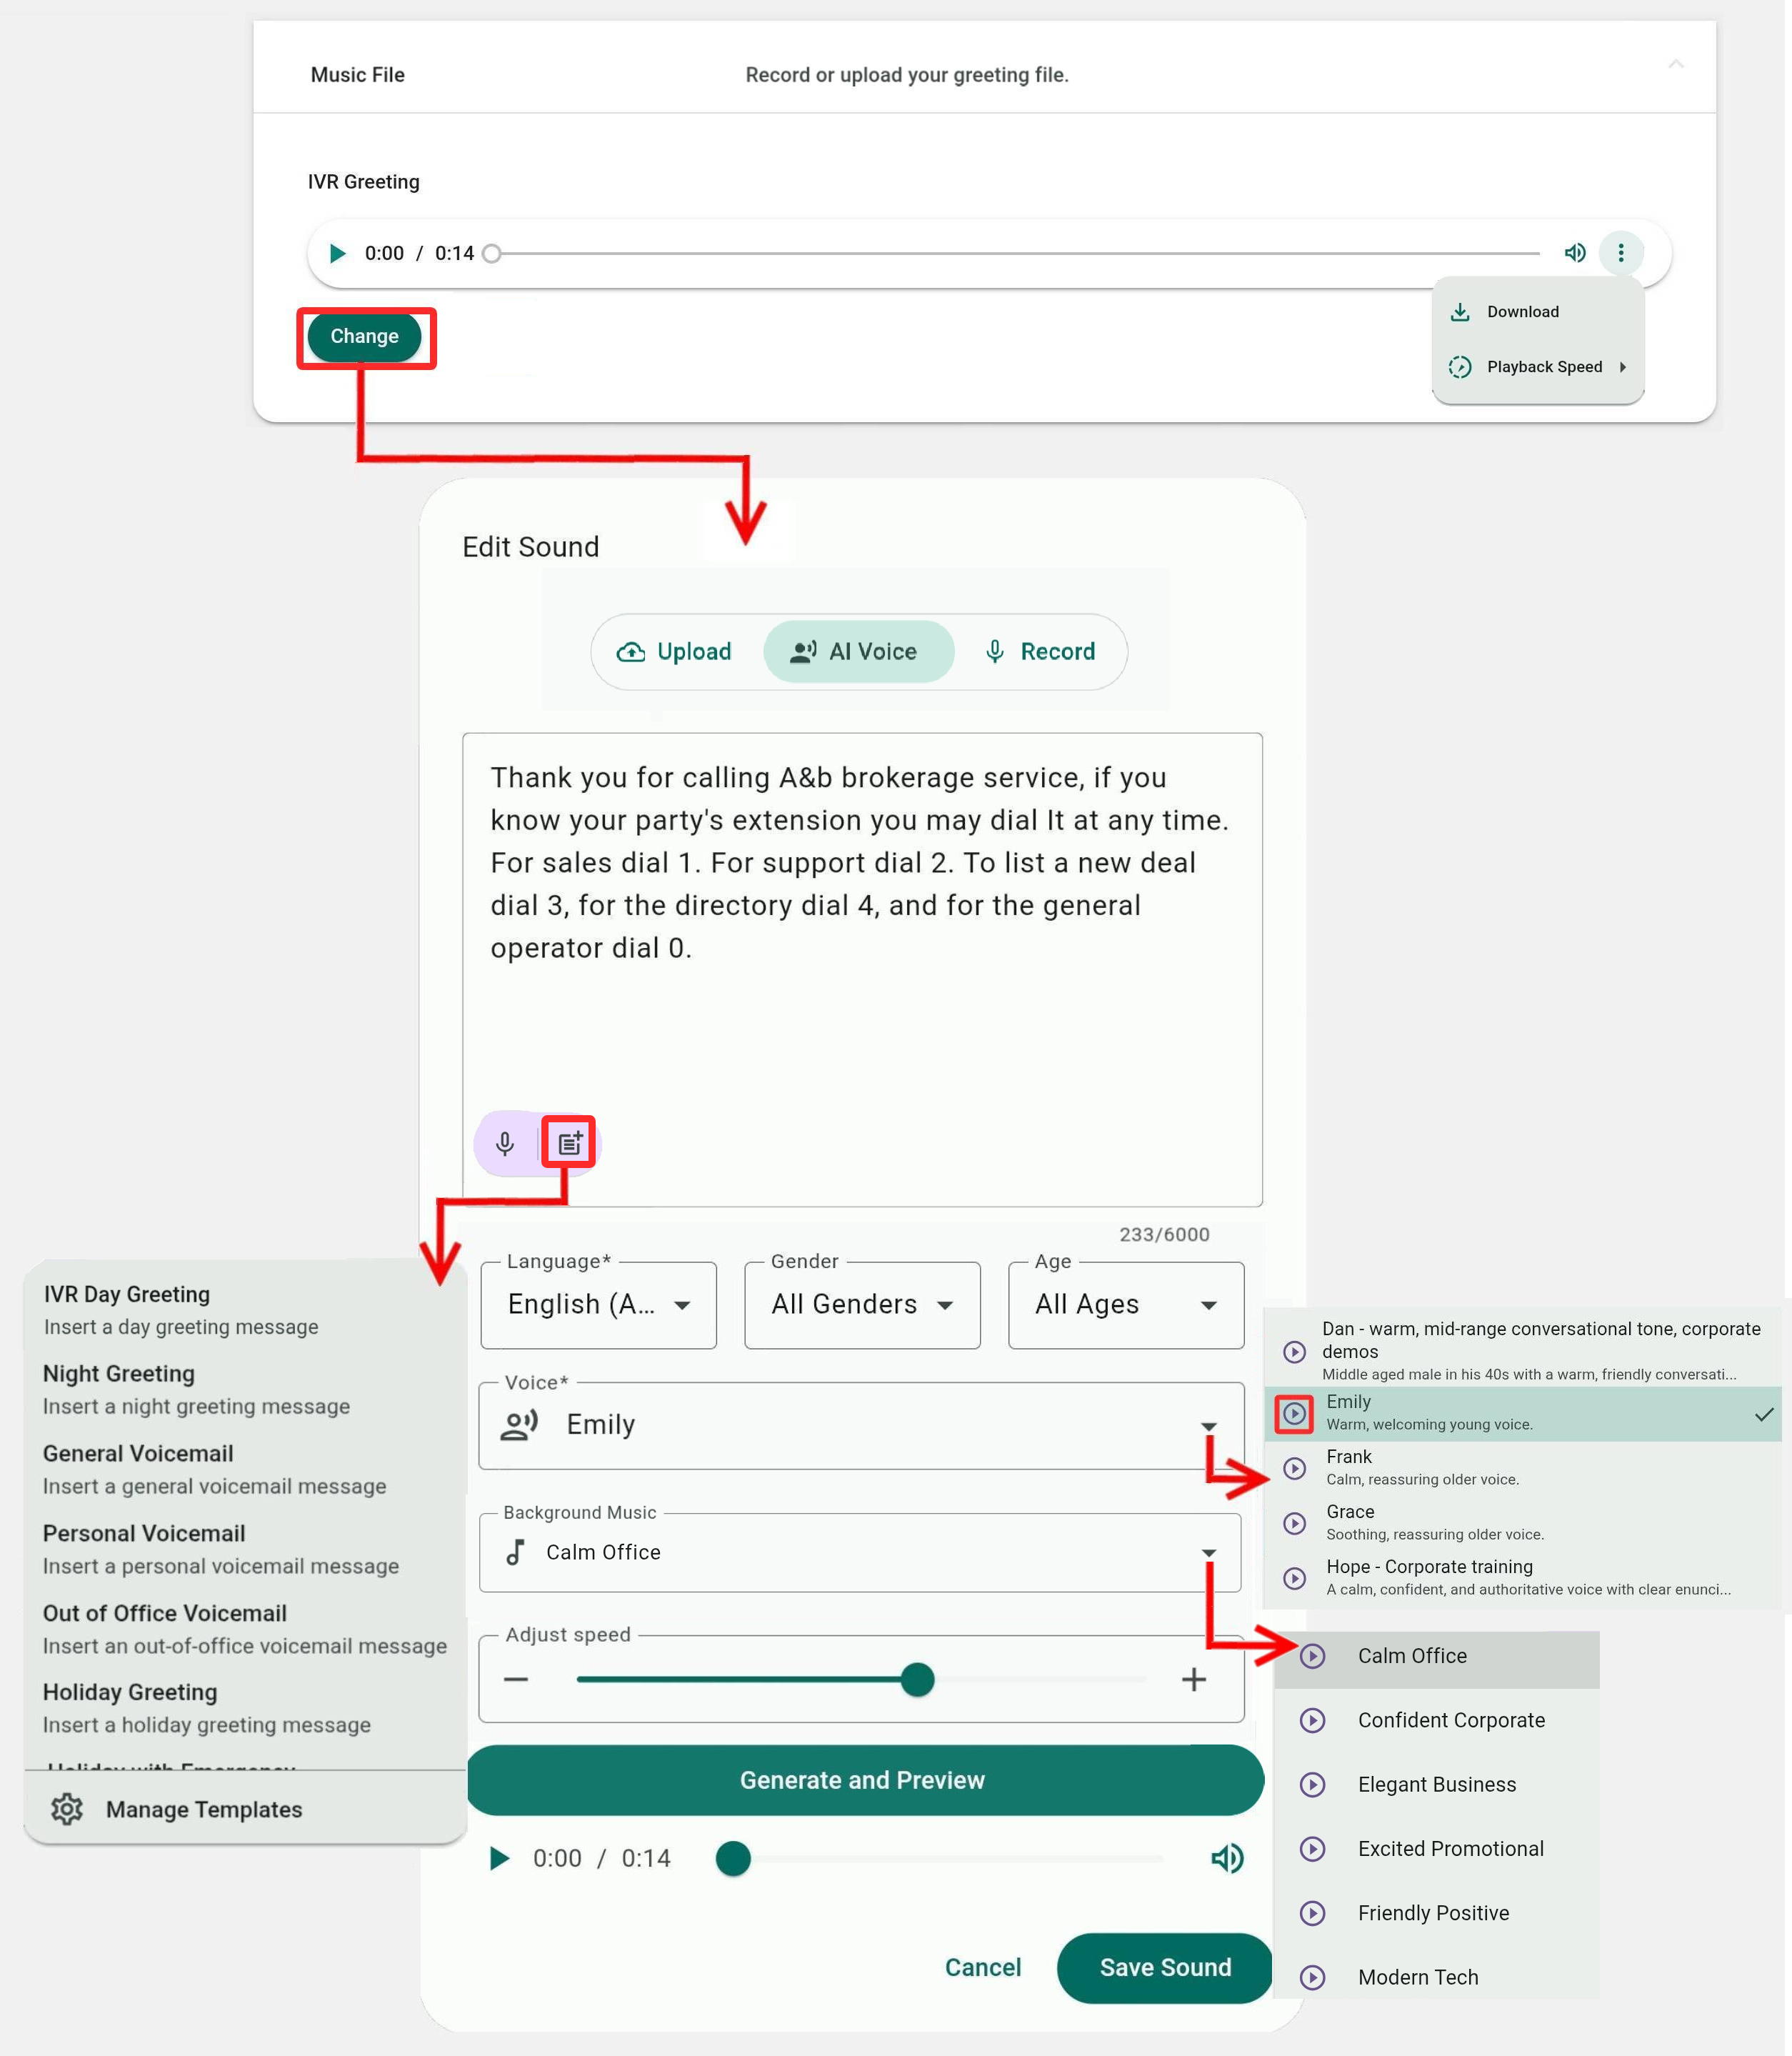
Using the AI Text-to-Speech Voice Engine
Prefer not to use your own voice? No problem.
Under the AI Voice tab, you can type or dictate ( ) text and have it generated as an audio file with a Voice and delivery Speed of your choice.
The Language, Gender, and Age drop-down menus are filters for narrowing down the available voice. Click  next to a voice to preview an audio sample of it. Select Generate and Preview to listen to the generated audio. If you are satisfied, select Save Sound to keep it and assign it to the sound file.
You can also select a Background Music for the AI to mix with the spoken text for a more lively delivery.
Text-to-Speech Templates
Click  to manage and use common text templates as text-to-speech sound files.

System templates come with placeholders, marked by curly brackets, that you need to replace with relevant content (the Generate and Preview button will remain grayed out until you do).

If you already have some text entered or selected a template, selecting another template will prompt you to Append it to the existing text or Replace it.

Clicking Manage Templates shows the existing system templates and lets you create new templates with the  button.
For new templates, provide the Template Name and Template Text (the Description is optional). Use curly brackets for placeholders, as needed. Naming placeholders is entirely up to you. They should be short but descriptive enough. You can look at some system templates for examples.
Existing system templates can only be copied (duplicated) to create template variations. New templates or copied templates can be copied, deleted, or clicked to be edited.