Usage
The Admin Center's Account page is accessed from the side navigation menu and lets you manage the phone system's general settings and the profile of the account owner (the phone system's administrator or individual who is invoiced for the phone service).
Currently, only the Settings tab is functional. Future updates will add Plan Info, Invoices, and Orders tabs that will provide details about your service plan, invoices, and payment methods, and let you place orders for phone equipment and additional Telebroad services.
Account Settings
The Account Settings tab has seven expandable categories to manage the settings of the phone system, the account owner profile, default new items, roles, account security, and AI transcripts prompts. An eight tab – The AI Call Intelligence Prompts becomes available when AI Call Intelligence settings are enabled. You can also change your company logo from the settings page.

Company Logo
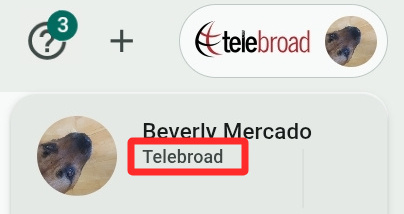
The company logo appears next to the Accounts Menu (the icon with the profile picture or initial of the current user). Since users can sign in and use multiple Admin Center accounts, the logo helps them to visually identify which account (or company) they are currently working with.
The default company logo for new accounts is Telebroad's logo.

To assign your company's logo to the account, select Add Logo and upload it.

Your logo has to be rectangular and fit inside the frame box (marked by six handles). If it is too big, resize it down with the Zoom slider and adjust the frame box to make it fit better by dragging the handles.
The Rotate slider lets you rotate the logo to any angle and the rotation buttons ( ) rotate it by 90 degrees. You can also flip your logo horizontally (
  ) or vertically (
 ).
).
Once you fit your logo, click Continue and Confirm to apply it to the account.
To change the logo again, click it in the Account Settings and select Change. If you Remove your logo, the Telebroad logo will be reapplied to the account.

Account Profile
The Account Profile category can be viewed by all users with an Account Owner role, but presently it can only be modified by a system administrator.
- Organization Name: Self-explanatory. The organization name appears under the Accounts and Themes menu. This is helpful for users who have multiple accounts, letting them know which account they are currently using.
- Account owner First name/Last name: Self-explanatory.
- Billing Address/Phone number/Email: Self-explanatory. A monthly invoice for the Telebroad phone system service will be emailed to the email address provided here.
- PIN/Confirm PIN: If a PIN is entered and confirmed, the system will prompt for it for any features or account changes accessed over the phone. Leave this blank to disable the PIN prompt request.
Account Settings
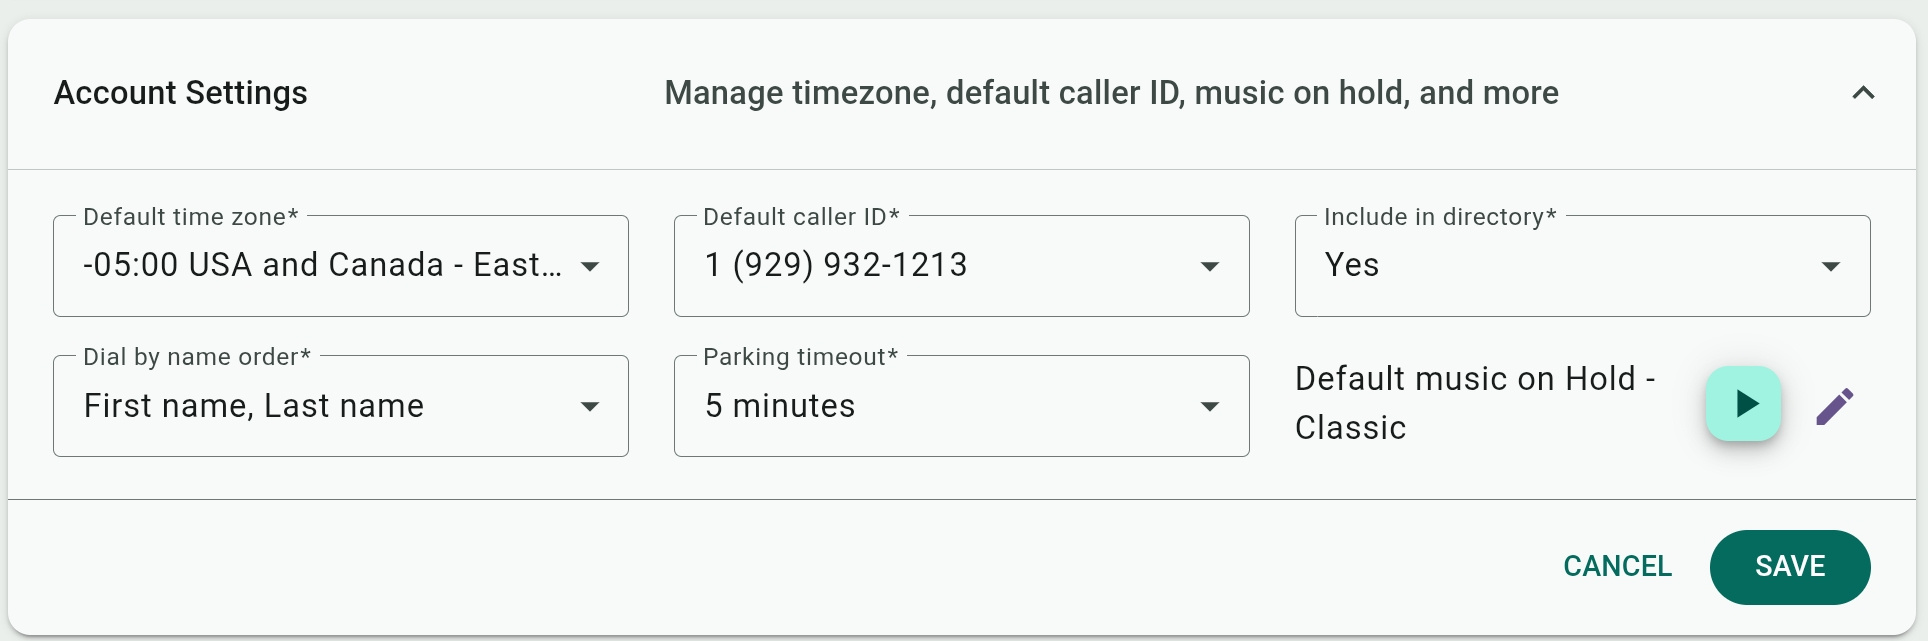
- Default timezone: This is the default timezone for the entire phone system, but TeleConsole users can select their preferred timezone.
- Default caller ID: Select the default caller ID for the entire phone system. TeleConole users can select the "Default" caller ID option when calling or faxing to apply this selection. They can also select their preferred caller ID if changing the caller ID is not restricted in the Account Security settings.
If you set the default caller ID to "Unknown", it will allow TeleConsole users to make anonymous calls when they prefer not to provide their number when calling. Just be aware that anonymous calls are more likely to get rejected and may also get phone numbers labeled as spam. - Include in Directory: Select Yes to include the account's users in the "Dial by name menu" feature. The "Dial by name menu" is found under the Predefined Features when selecting a routing destination or a feature. See this article for more details.
- Dial by name order: Select how the system will prompt callers to enter and search for users' names when using the "Dial by name menu" – starting with the first name or starting with the last name.
- Parking timeout: Select how many minutes the system will wait before returning an unclaimed parked call back to the user who parked it.
- Default Music on Hold: Select
 to change the default music callers hear when they are placed on hold. You can pick existing music from or upload or record your own by selecting Add Music. To manage the music selection, go to Admin Center Menu>Voice Features>Audio Files and select the Music On Hold tab.
Default Settings for New Items

- Enable call recording on new lines: When toggled on, newly created lines will have their recording setting enabled, with all inbound and outbound calls recorded.
- Recording group: The default recording group for newly created lines.
Enabling call recording and selecting a recording group can be set separately for each user on their Lines & Devices page, as shown here.
- Voice / Default speed: Select the default Voice and its delivery speed wherever for text-to-speech generation across the Admin Center. These can be changed and set separately for each page and feature where text-to-speech is available.
Account Security

- Restrict Caller ID changes for users: When disabled, users can select any available caller ID for calling or faxing. When enabled, users can only change their caller ID to the phone numbers to which they were given caller ID access. Caller ID access is configured in the General Settings of phone numbers.
Please note that phone numbers you buy or port are not available as caller IDs until they are added by Telebroad to the Phone Numbers screen.
- Enforce two-factor authentication for all users: When enabled, a second security layer prompts all users to provide an authentication code emailed to them after entering their Admin Center/TeleConsole login credentials. Users can select to receive the code on any of their Telebroad account emails. The code is valid for at least 15 minutes from the time it is sent and can be used to sign in to both the Admin Center and the TeleConsole.
To apply two-factor authentication to an individual user, go to the Users screen, select the user, and expand their Profile options. - Require verification code for support access: When enabled, Telebroad support representatives must enter a verification code before being able to access your account on Telebroad's internal support platform. The code will be delivered by email or text message and can be provided to the representative when a support session is initiated.
- Enforce login with Google or Microsoft account for all users: When enabled, all users are required to use a Google or Microsoft account to sign in to the Admin Center or TeleConsole instead of their Telebroad account.
To apply two-factor authentication to an individual user, go to the Users screen, select the user, and expand their Profile options. - Restrict SMS deletion in the Teleconsole: When enabled, all Teleconsole users will be restricted from deleting SMS/MMS messages and conversations.
- Restrict fax deletion in the Teleconsole: When enabled, all Teleconsole users will be restricted from deleting faxes.
- Disable AI Transcripts and Summaries in the Teleconsole: This option is visible only if AI transcripts are enabled for the account (see AI Transcription Settings below). AI transcripts and summaries can be viewed by users in their Teleconsole Calls Log page. Enable this option to globally hide these from users in the Telesonsole.
User roles & privileges
A user's role determines their access privileges to features and functions of the Admin Center or the TeleConsole.
To set or change a user's role, open the Users & Phones page, select the relevant user, and expand the User Profile settings.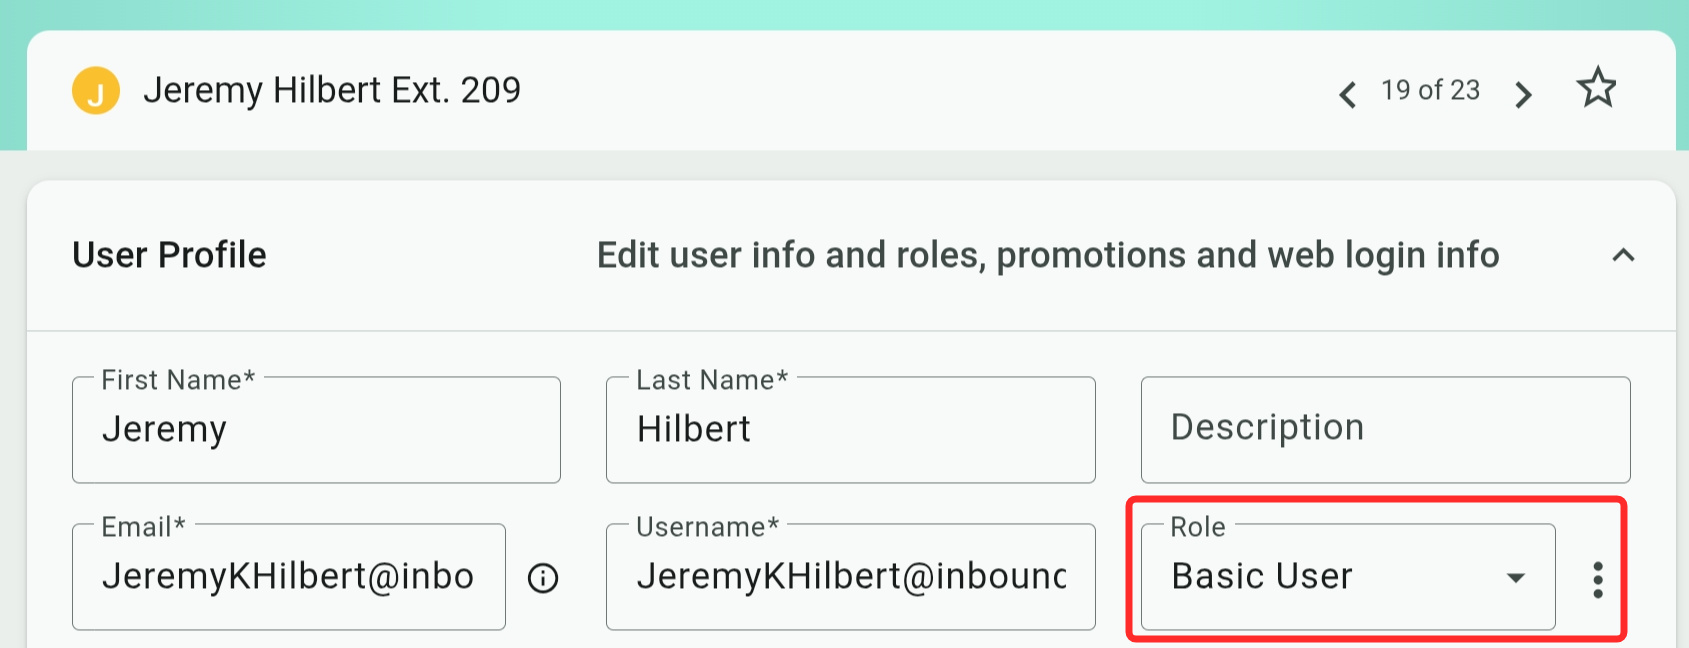
There are four default system roles:
Account Owner – has administrator-level access to all the features, options, phone lines, and users of the Admin Center.
Basic User – can only access the Users & Phones options and can only manage and modify their own phone lines.
Limited User – cannot access the Admin Center but can access the TeleConsole.
Disabled User – login is disabled for this role and users assigned with it cannot access any Telebroad accounts and services.
System roles cannot be modified, but you can edit ( ) or delete (
 ) new roles you create.
Creating New Roles
Select ADD ROLE to create additional roles to accommodate different users or scenarios.
You can set permissions for the Admin Center and for the TeleConsole. On either permission tab, find and check all the system features, destinations, menus, actions, and pages that a user may access, operate, or modify with the new role.
For example, you can add a Call Center Manager role for a user who needs to access the Active Calls Switchboard, ACD Dashboard, and TeleConsole chats but doesn't require full administrator privileges or other TeleConsole functions.
For Admin Center permissions, you can use the Search box to narrow down and limit the displayed options. The results may show features with relevance to your search, even if they don't include the actual search term. For example, the All Hunt Groups technically includes the Billing hunt group, hence the Hunt Groups section will show both.

TeleConsole Permissions
TeleConsole Call permissions are always allowed for all roles. You can enable or disable five other TeleConsole permissions.
- Chat: Access to the Team and Direct Chat feature for collaborating and exchanging text messages, voice notes, and files with users on the phone system.
- Contacts: Permits users to create and save TeleConsole contacts and view company contacts.
- Fax / SMS: Permits users to send and receive faxes or SMS messages. A user also needs to have a fax or SMS number to be able to use faxes or SMS messaging. Assigning a number as such is done from its General Settings on the phone number page. See more details here.
- Voicemail: Permits users to receive voicemail messages. A user also needs to have a mailbox number to access their voicemail messages. Mailboxes can be created when adding new users or from the Mailboxes page.
Users with voicemail access (or with a Basic User role) can play and manage their voicemail in the TeleConsole or from the Admin Center (for the latter, see this article).
Admin Center Permissions
There are three categories of Admin Center permissions.
Data Permissions: Expand the relevant data permission feature and check the Users, Phone Numbers, Hunt Groups, and Call Queues that users with this role may view and modify. Note the "All" box for easily selecting all available choices.

For the Users feature, you can check the My Own User Info to allow users to access and manage their own accounts. If you need a role that allows users to just manage their own account and no other Admin Center features, there is no need to create a new role. Just use the system's Basic User role.

View Permissions:
- Active Call Switchboard: Allows users with this permission to view and operate features of the Active Call Switchboard – viewing Real Time Data Display, Hangup Calls, Join Calls (to talk with both parties or just the caller), Pickup Calls, and Transfer Calls.
- ACD Dashboard: Allows users with this permission to view and operate features of the ACD Dashboard – viewing Real Time Data Display, Log In/out Agents, Hangup Calls, Join Calls (to talk with both parties or just the caller), Pickup Calls, and Transfer Calls.
- Call History: Select to Allow users with this permission access to Call History reports (without access to call recording), Block them from accessing call history reports, or Allow With (access to call) Recordings.
Users with an Account Owner role get recording access by default. - SMS History: Select to Allow users with this permission access to SMS reports (without being able to see message content), Block them from accessing sms reports, or Allow With View Text (access SMS reports and also allowed to see message content).
Users with an Account Owner role get text viewing access by default. - Fax History: Select to Allow users with this permission access to Fax reports (without being able to see fax content), Block them from accessing fax reports, or Allow With View FAX (access to fax reports and also allowed to see fax content).
Users with an Account Owner role get fax viewing access by default. - Saved Reports: Select to Block users with this permission from accessing Saved Reports, access to Saved Reports with Owned Reports Only permission (viewing, deleting, and editing only the reports they created), or All Reports (viewing, deleting, and editing the reports they created as well as reports created by other users).
Users with an Account Owner role have All Reports access by default.
- IVR Menus: You can allow access to All IVR Menus or to each IVR menu separately.

- Alerts: You can allow users access to Owned Alerts Only (that they created or were assigned as owners of), All Alerts (including alerts owned by other users), or Block access.
Note that the All Alerts access only provides viewing permissions. To edit other users' alerts, full Data Permissions (All Users, Phone Numbers, Hunt Groups, and Call Queues) are required.
 Additional View Permissions: Check the other boxes here to give access to –
(For users, phone numbers, queues, and hunt groups, only viewing permissions are granted here. To allow modifications and full control of these pages, refer to the Data Permissions above.)- Home Page
- AI Call Intelligence Settings– these appear on the account settings (and are described below). But as a premium feature, access can be set separately.
- Live Wallboard
- Users & Phones
- Phone Numbers
- Mobile Devices (UNI-Mobile service)
- Voice features: Extensions, Hunt Groups, Queues, Mailboxes, Sound and Music Files, Speed Dials, Schedules, Page Groups, Pickup Groups, Pattern Menus, WEB URLs, and DISA Caller IDs.
- SMS Auto Replies and SMS Campaigns
- Analytics
- User Events
- Audit Logs
- App Integrations
- Home Page
The Account permissions control access to all the settings discussed in the article you are currently reading. Although the AI Call Intelligence Settings (discussed next) are part of the Account settings page, each permission can be enabled or disabled independently.
The Conference voice feature and Developer Panel can be added to roles, but are not yet active in the Admin Center.
AI Call Intelligence Settings
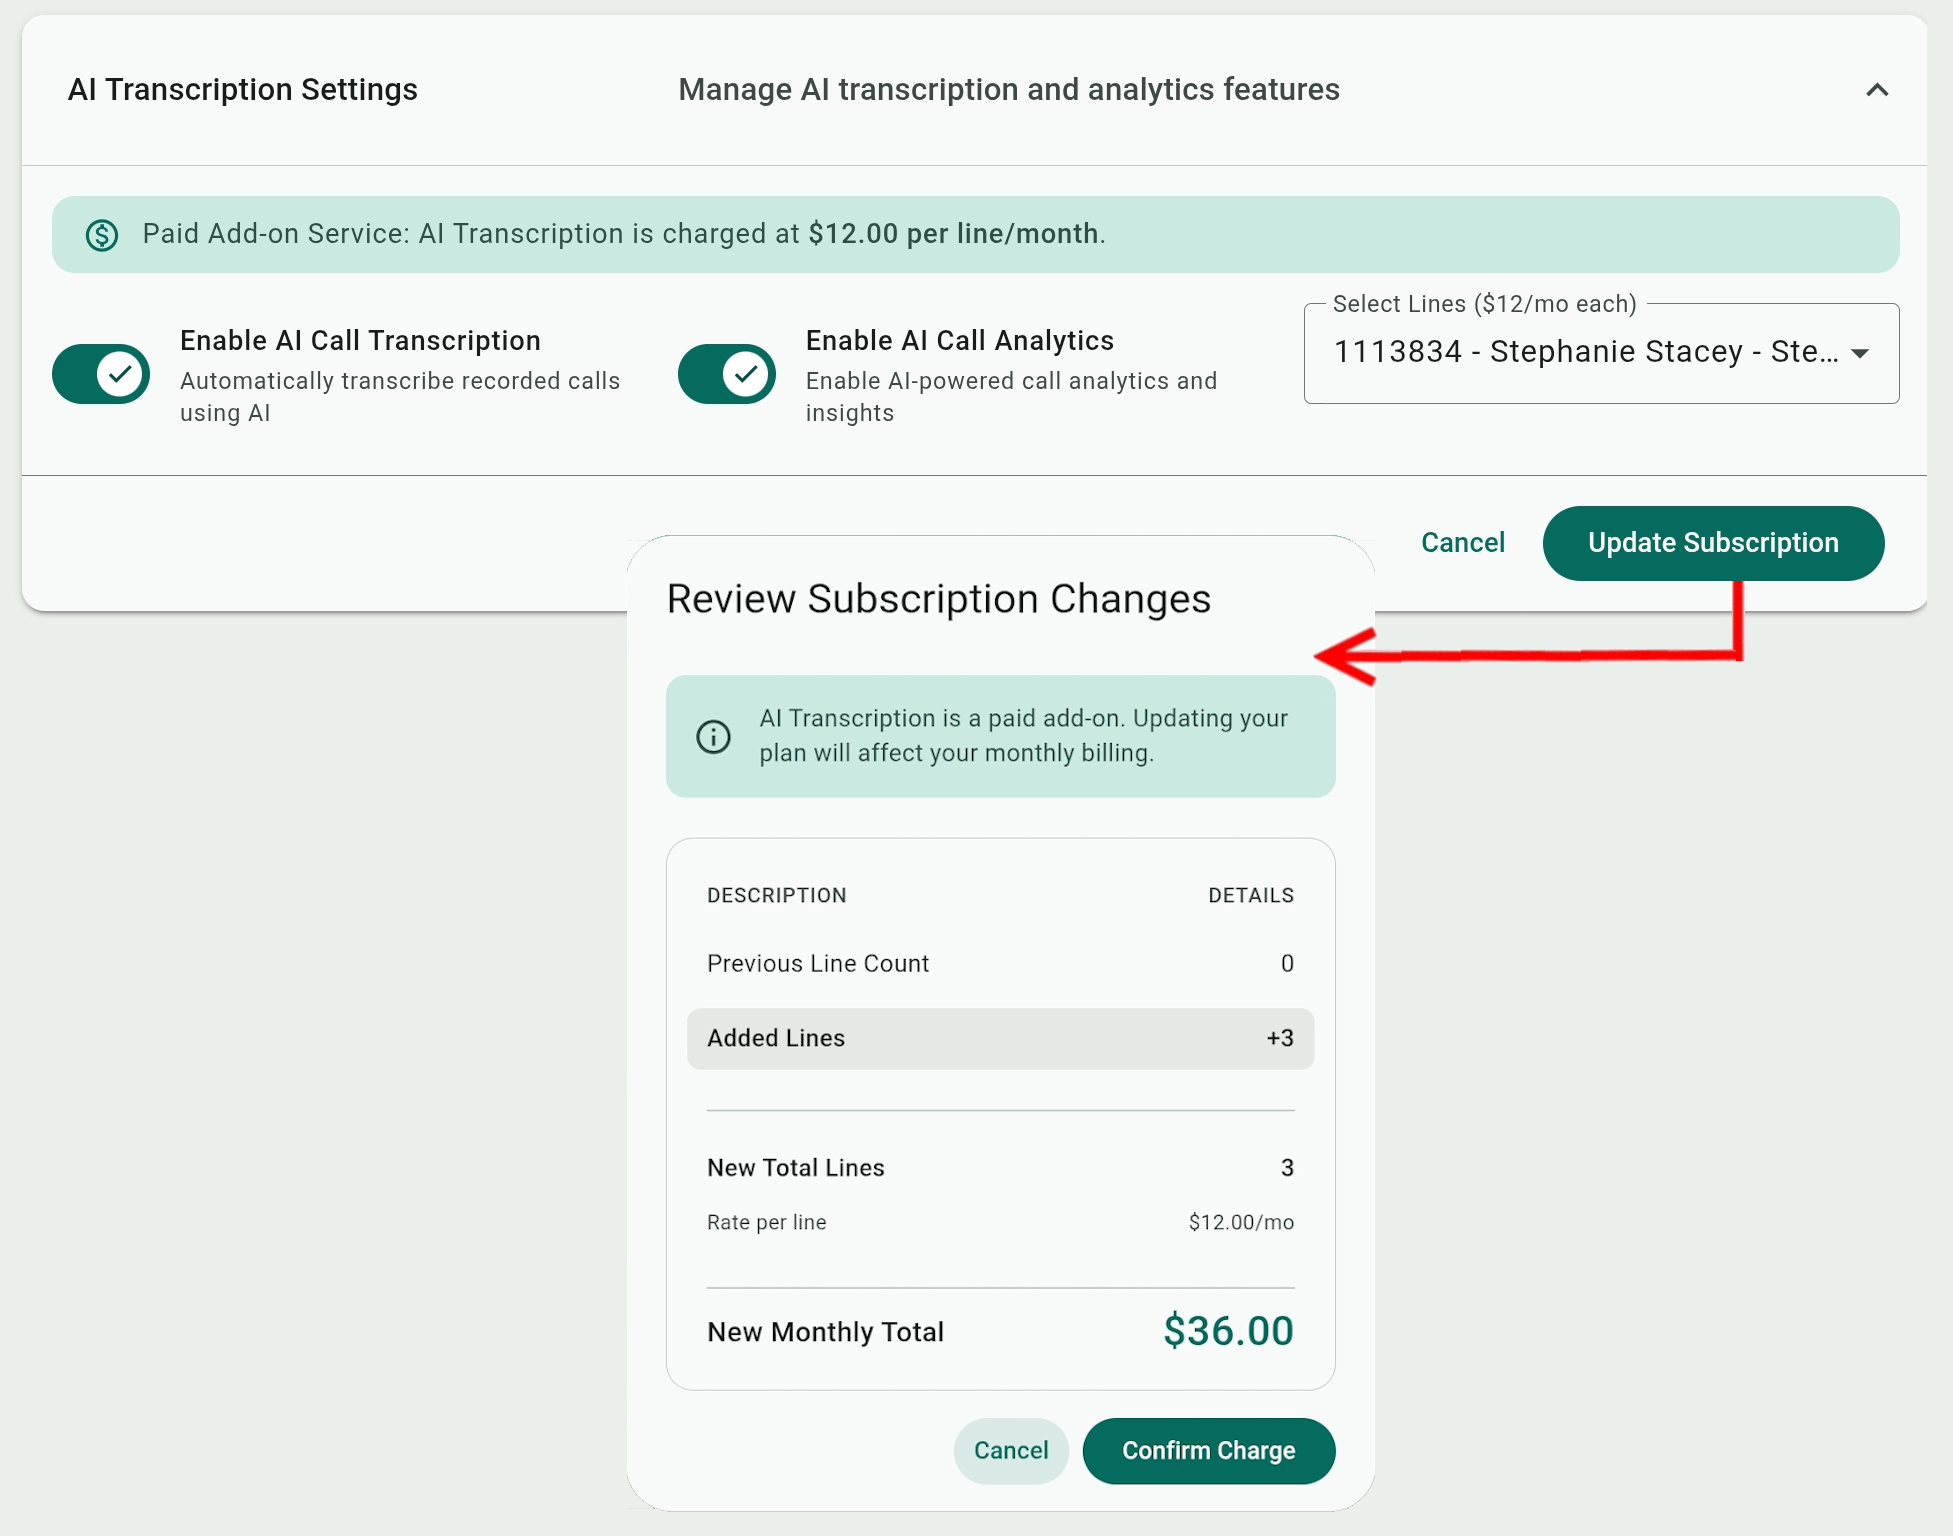
When enabled, AI Call Analytics and AI Call Transcriptions are automatically generated for recorded calls. AI call transcription and analysis is a premium add-on service that is billed at $12/month per line!
Activation is accessible to Account Owners or users with a view permissions role for AI Transcription Settings (see previous section).
You can toggle on both features or each one seperately. In the Select Lines list, check or uncheck the user lines to apply the service to and click Update Subscription. The system will prompt with the number of lines added, the total number of lines enrolled, and the additional cost. Click Confirm Charge to approve the additional monthly charge and activate the service.
 After activating the service you need to enable call recording for each enrolled user to see analytics and transcripts for them. Call recording settings are found on the Lines & Devices page.
AI call analytics and transcripts can be viewed in the Call Details of the Call History page and are also included as KPIs or columns in the Call History report, Analytics, and Saved Reports.
Users can also view AI call summaries and transcripts in their Teleconsole Calls Log page, unless if this option is disabled in the Account Security Settings (see above).
AI Call Intelligence Prompts
These are displayed once you enable the AI Call Intelligence settings. Refresh your browser if you don't see them.
While AI analytics is automatically generated, it can be tweaked with the following settings. If you select RESET TO DEFAULTS, all of the categories, prompts, and Custom KPIs you added will be removed, and any default categories you deleted will be added back.
- Call Purpose Categories: These correspond to the same AI Insights tag that indicates the general intent of the call, based on the existing default categories listed here. You can enter new categories or remove ones by clicking
 .
. 
- Customer Satisfaction Examples/Agent Performance Examples: These correspond to the same AI Insights, KPIs, or data columns and let you provide bullet-point prompt examples to help the AI better understand and analyse customer satisfaction and agent performance more specifically for your products or services.
The following illustrates bullet-point prompts for a hypothetical shipping company:
- Action Required Examples/Urgent Action (Churn Risk) Signals: These bullet-point examples also correspond to the same AI Insights, KPIs, or data columns and help the AI better understand and tag actions or urgent actions required more specifically for your products or services.
The following illustrates bullet-point prompts for a hypothetical shipping company:
- Customer General Instructions: These bullet-point examples relate to the Call Summary and Key Points of AI Insights on the Call History page. They provide the AI with general details about the company/organization, guiding it on how to present it, its products or services, and what it should include or exclude in summaries and key points.
The following illustrates bullet-point prompts for a hypothetical shipping company:
- AI Custom KPIs: Not to be confused with the custom KPIs on the Analytics or Saved Reports pages that measure call parameters, the custom KPIs that you can create here (up to 25) are defined by AI prompts for tracking and reporting just about any topic, issue, or metrics appearing in call transcripts.
Click to add a new custom AI KPI and name it. If the name has several words, it is advisable to connect them with underscores instead of spaces, as this lets you clearly reference the name in the evaluation and description prompts, without potentially confusing the AI. For example, in the following figure, we are referencing the KPI oversized_package for its possible true/false value while asking the AI to describe the oversized package.
In addition to a verbal summary, you can set the KPI to provide a SCORE (1-10) or a True/False statement for its KPI evaluation.
In the Evaluation Prompt, instruct the AI how to analyse the transcript and what information or values it should gather or calculate. In the Description Prompt, instruct the AI how to summarize and explain its findings.
In both prompts, "null" is a useful word to describe a lack of data or to tell the AI to leave the resulting description empty.
The following illustrates bullet-point prompts for a hypothetical shipping company:
Once created, custom KPIs can be found in the Analytics, Call History, and Saved Reports pages under the Manage Column/Configure KPI menus and are tagged as "AI".
You can also filter report results by custom KPIs from the AI Custom KPIs filter.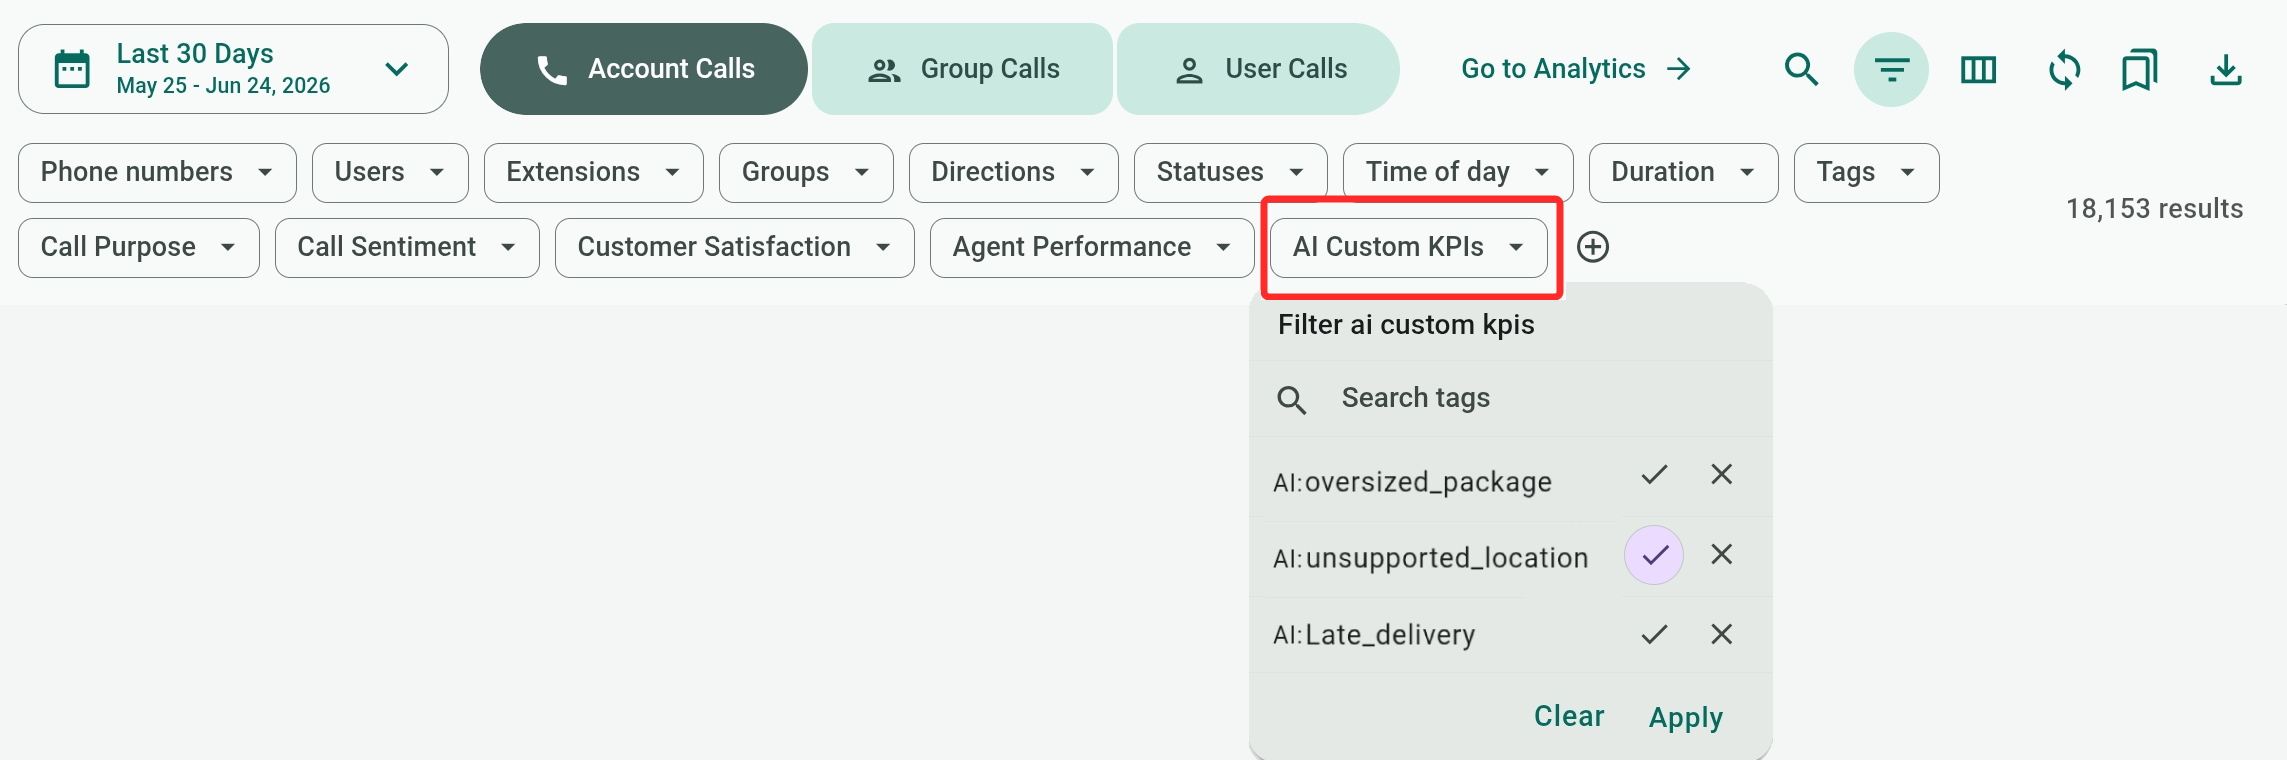
International Calling
With the International Calling settings, you can allow or block calling to international destinations.
The main Default access to unlisted countries toggle gives you general control. Toggle it on to allow international calling to all destinations or toggle it off to block international calling.
You can then add additional rules to Allow or Block specific destinations. Simply look for and select countries to add them to the Rules list. You can select to block the Entire country, specific cities in the country, or specific mobile or VoIP providers of the country.