Usage and Access
The Call History report lists call details for all users in a specified date range. The listed calls can be sorted and filtered. Selecting a call shows its journey – how it moved between different destinations in the phone system. You can also view and listen to call recordings.
Access the Call History page from the Admin Center Menu>Reports>Call History. To access the page, a user needs to be an Account Owner or have a role with Call History view permissions (roles are explained here).
Call history records cannot be deleted! Also, be aware that a single call from a hunt group or a call queue that rings multiple agents appears as separate records for each agent.
You can search ( ) call records by caller name, caller ID, or dialled number. You can also look for words or phrases from call insights or transcripts (note the difference from the Global Search box on the top toolbar, used for finding Admin Center features and items).
With the Go to Analytics button, you can apply the date range and filters to the Analytics Dashboard.

Date Range

The Date range field offers predefined date choices – Today, Yesterday, Last Week, etc.
You can also use the Enter a custom date range field to select a date range of your choice. Click the date to enter it manually with your keyboard or click  to set the start and end date from a calendar.
Exporting Data
Use  to export a CSV file of the current report as selected in the Report Type menu.
Calls included in the file are based on your date range and filter selection and will appear in the order you have sorted them. Only the data columns you checked appear in the file, and each call is also assigned an ID.
The menu also lets you export all the call transcriptions (if available) or call journies for the selected report.
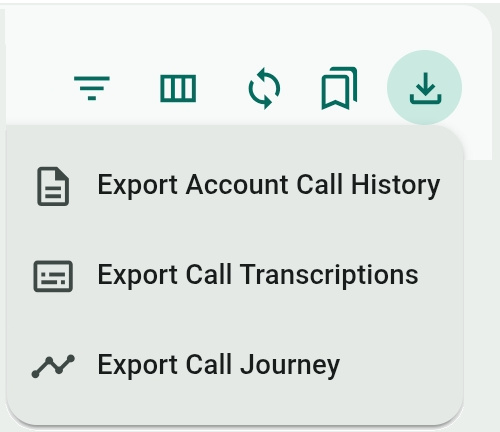
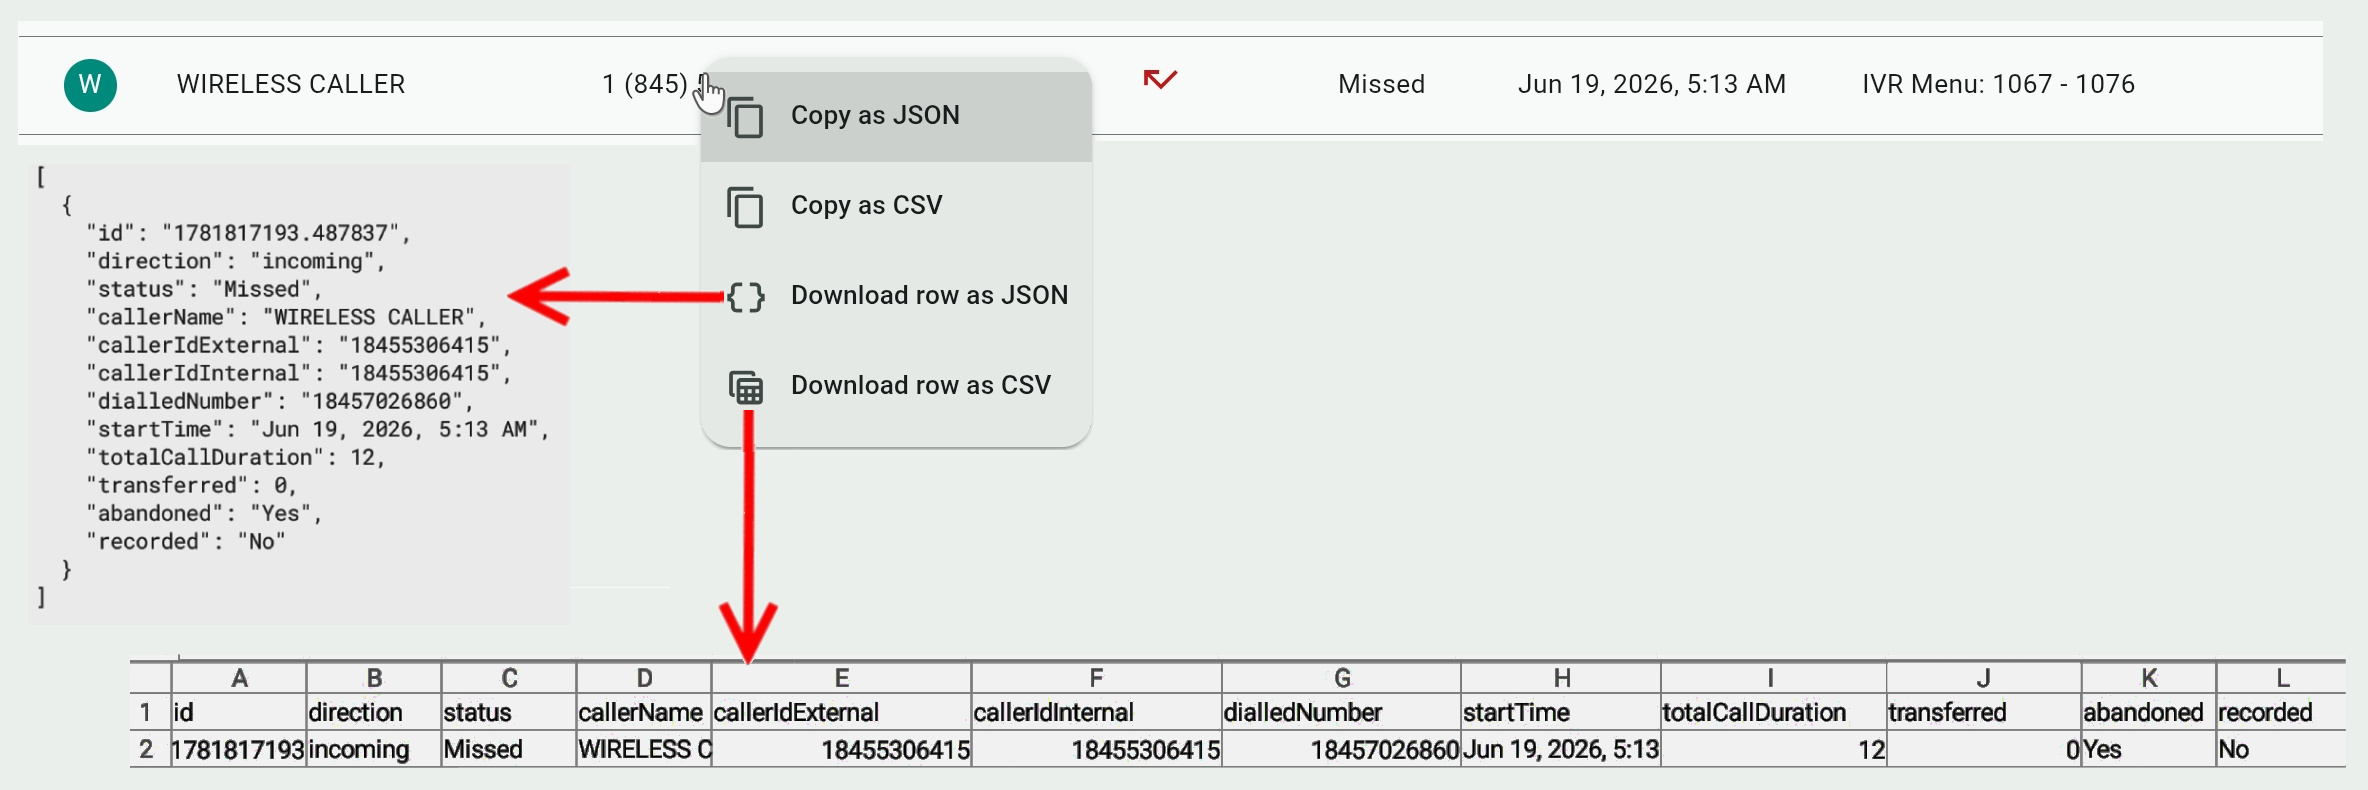
You can export a single call history record by right-clicking (or long-tapping) it and selecting to download or copy its data in JSON or CSV format.
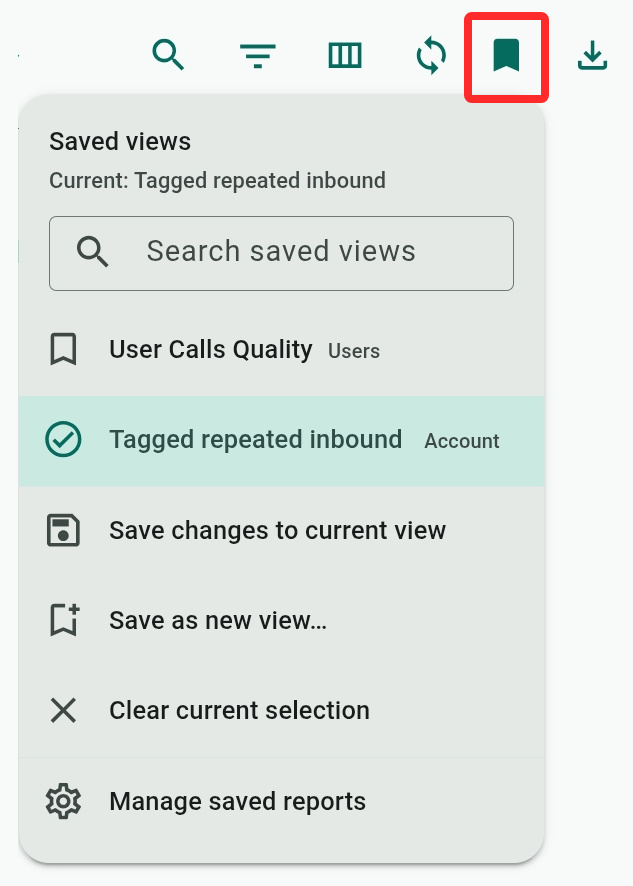
Report Saved Views
A report view is the data that the system displays based on the data columns, KPIs, filters, and the date range you select. Click the Saved Views (  ) button to manage report views (the button appears as
  when a view is actively selected).
Select a saved view (marked with  ) to switch to it. Note the report type is indicated next to the name of the view.
When a view is selected and you change any of its paramaters (columns, filters, date range), you can save these to either the current view or as a new view. If you don't select a view (or click Clear current selection) you can only save changes as a new view.
The Manage saved reports option will take you to the Saved Reports page.
Report Type
You can generate three types of reports, each with a different set of data columns:
- Account Calls: Includes all calls and phone numbers for the account.
- User Calls: Only includes calls where a user is the endpoint for dialed or received calls. For example, an inbound call where the caller hung up when greeted by the main IVR is not included in this report since it did not involve a user.
Calls that are transferred are counted separately! So, when user A receives a call the report counts it once, and when the call is transferred to user B the report counts it again as a separate call.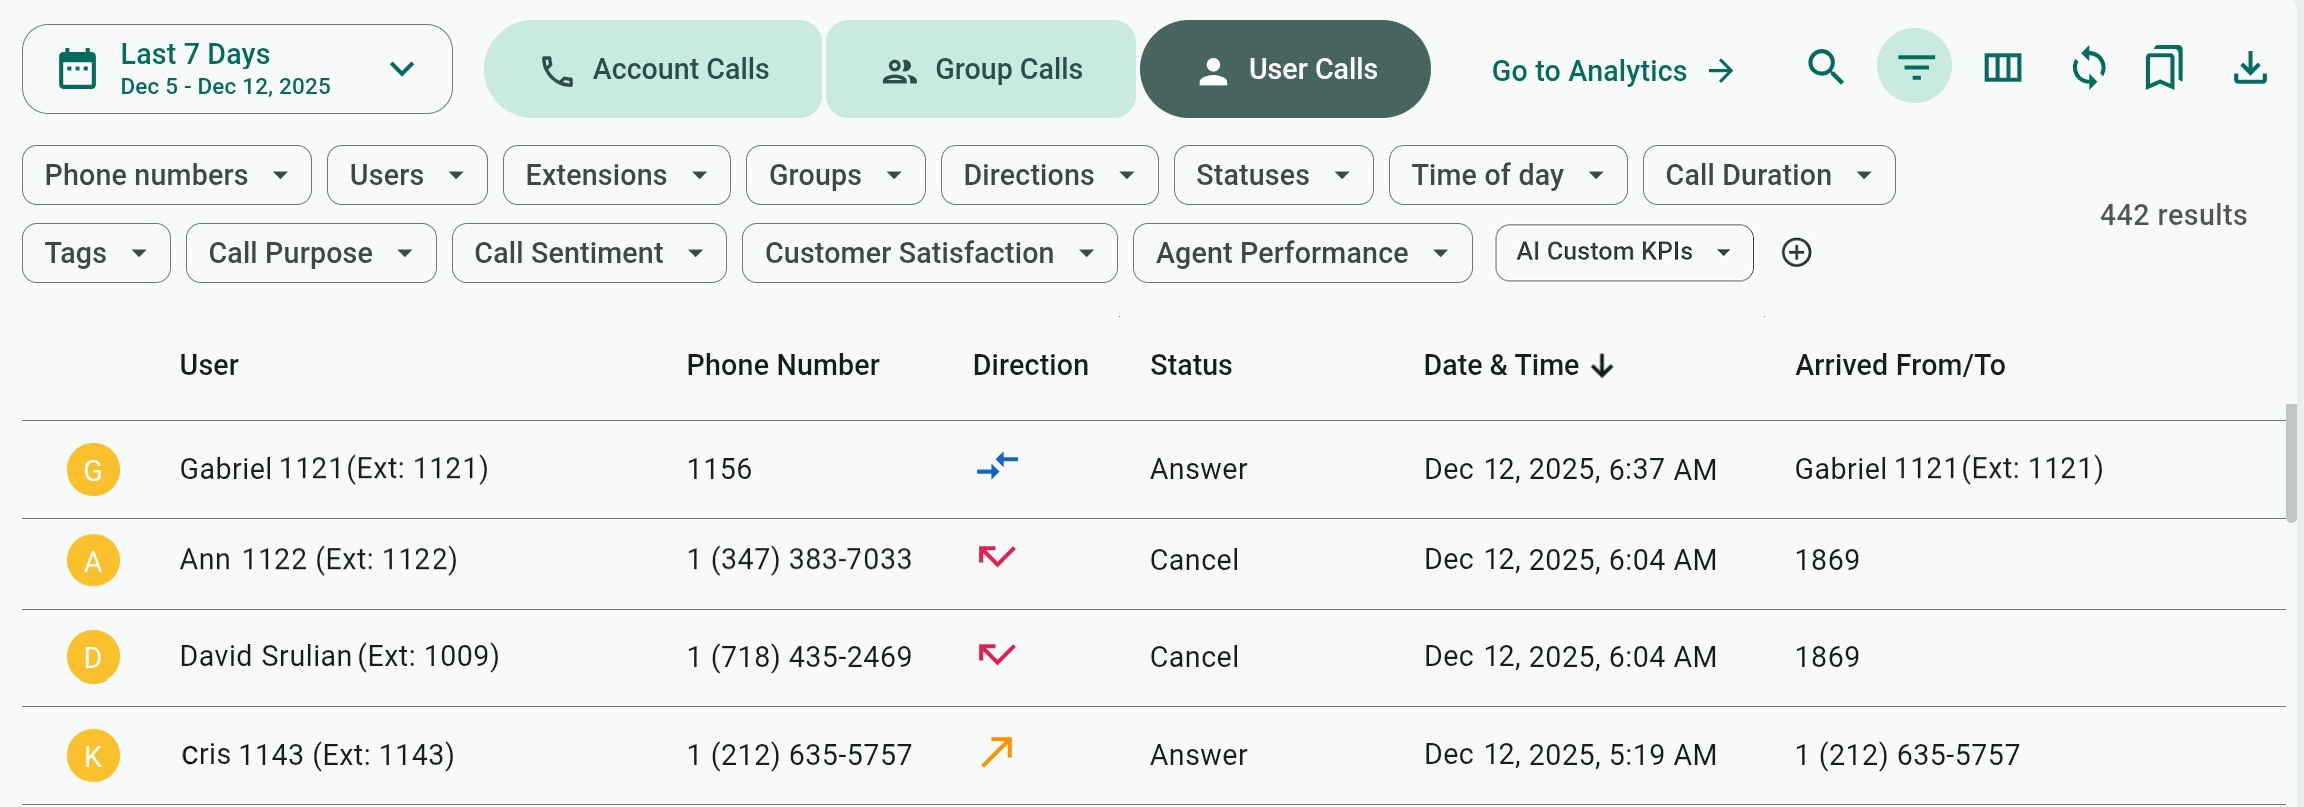
- Group Calls: Includes only calls routed to or from hunt groups (
 ) or call queues (
 ).
).
Managing Data Columns

Several data columns are shared between the three report types. The "Transferred" column appears in both Account Calls and User Calls, but provides different information.
The Account and User Calls reports may show additional AI Insights columns if the feature is enabled on the account. AI insights and AI-generated transcripts can be viewed by opening the call details page.
Not all columns are shown by default. Use the  button to display or hide columns. Use the Reset button to display the default columns of the report.
Shared Data Columns for All Reports
- Direction (Account Calls and User Calls):
An icon showing the initial direction of the call. For incoming calls, it also indicates the call status as answered or missed.
Incoming missed calls.
A call is considered a missed call if an agent did not answer or rejected it. A call is also considered missed if the caller hangs up during a voicemail greeting.
Incoming answered calls. 
Outgoing calls. 
Internal calls. - Status: Shows the eventual status of the call.
For Account Calls and User Calls the most common statuses are Missed, Answered, Cancel (user hung up while the call was ringing), No answer, Busy/Congested line, or delivered to the user as a Voicemail.
For answered calls that were transferred (and therefore inv, you may see that it was "Answered by 2 people" (or more).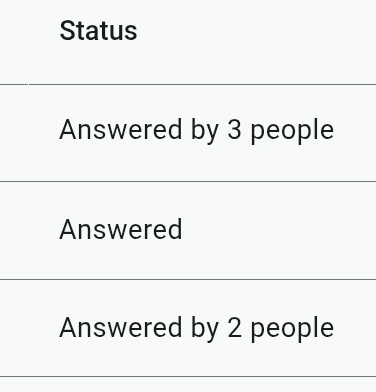
The Group Calls report has additional statuses – Abandoned by the caller (the caller hung up) or an Exit status when the call was routed out of the group. Exiting a group can happen after the system tried to ring all group agents, under certain conditions (like too many calls holding), or when the caller dials *. - Date & Time (all three reports): The date and time the call was initiated by a user or was first received on the phone system.
- Called Back (Account Calls and User Calls): Calls where a user or an agent called back a call they missed or that was routed to their voicemail.
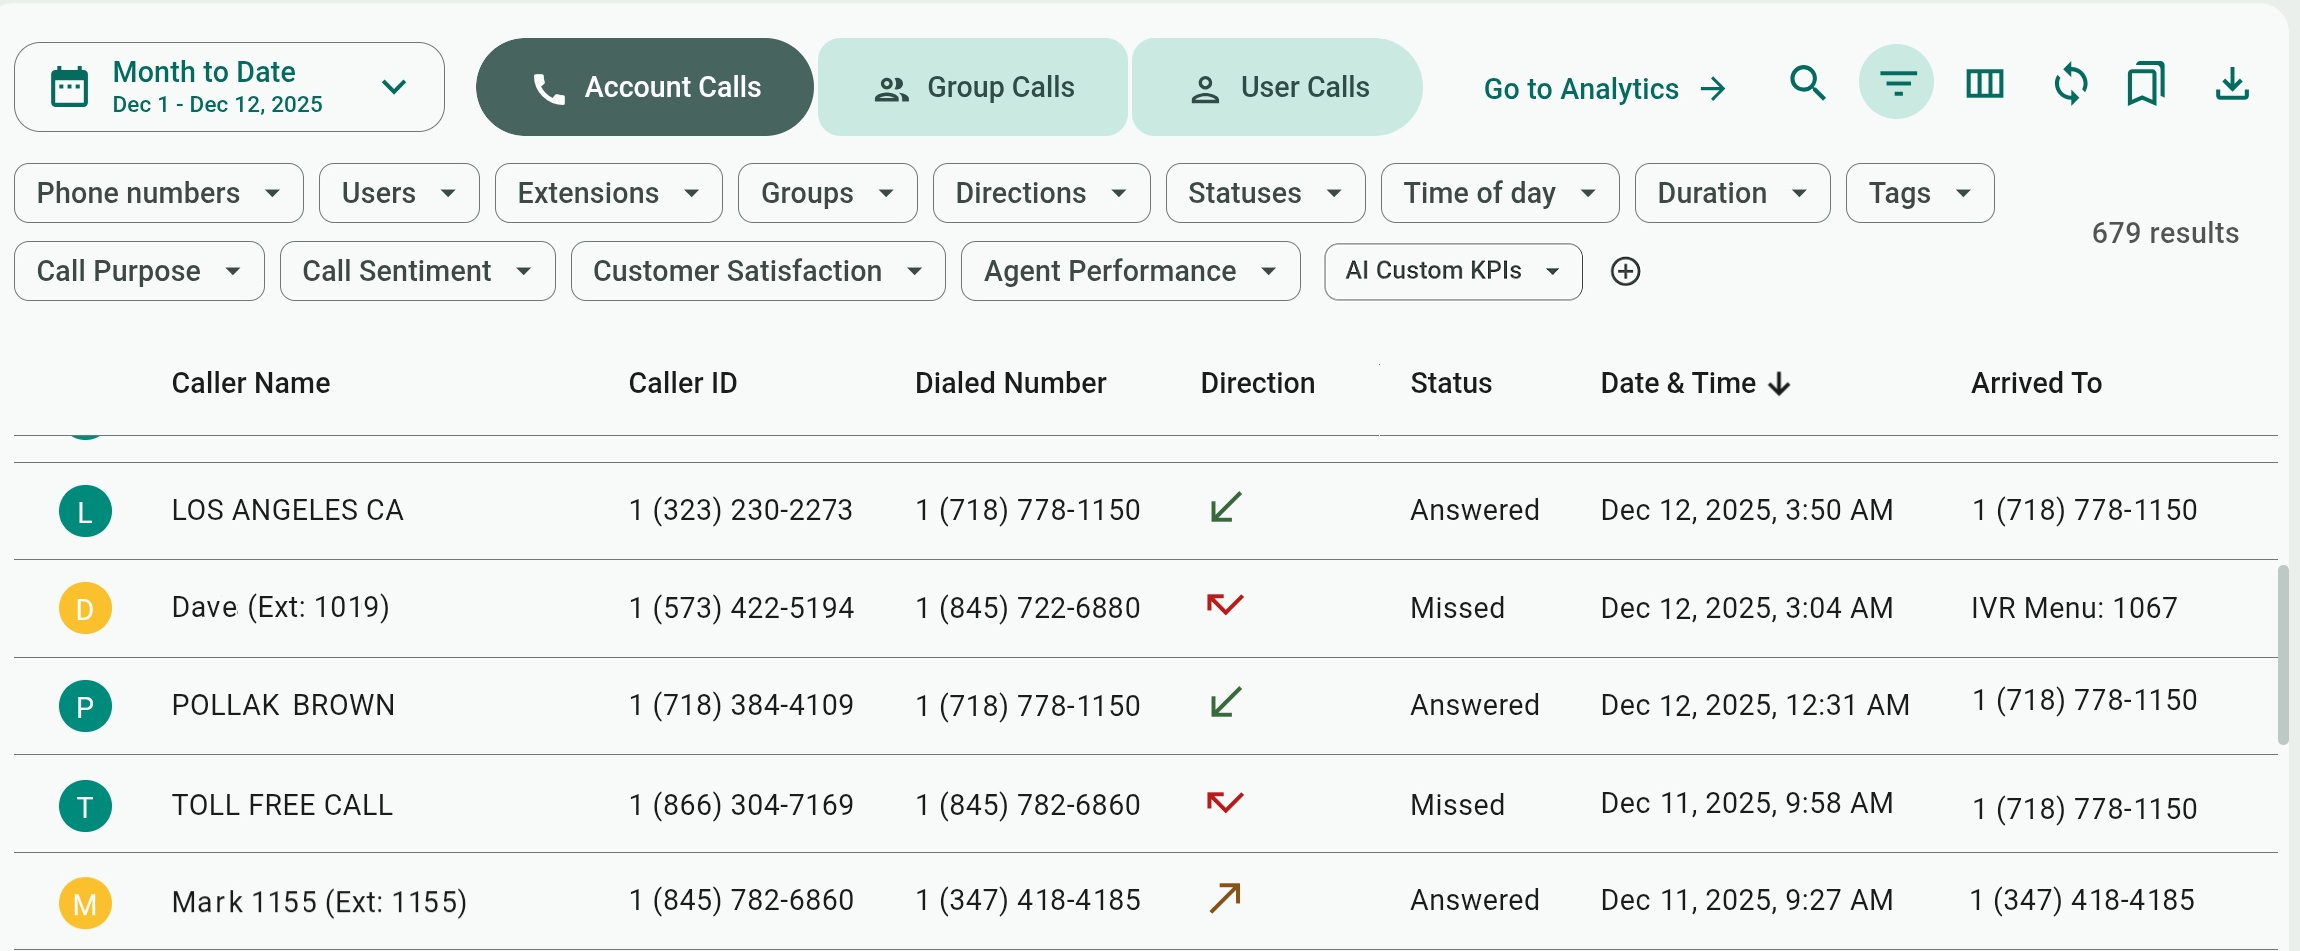
Account Calls Data Columns
- Caller Name: The name of the caller. Calls dialed by company users are indicated with a yellow icon of the user's initial (
 ) while calls coming from external numbers are indicated by a green icon of the caller's initial (
 ).
). - Caller ID: Caller ID for the caller's phone number or the user's phone line.
- Dialed Number: The phone number that the caller initially dialed (before the call was transferred or routed to other destinations on the phone system).
- Arrived to: The first destination on the phone system to which the call was routed.
You can see other destinations where the call was transferred to under the Call Journey tab. - Duration: Total duration for the call, including ring and talk time.
- Abandoned: Calls hung up by the caller while the call was waiting in a queue or during an IVR greeting.
- Transferred: The number of times the call was transferred (0 value if the call was not transferred).
- Repeated: The number of calls that were repeatedly dialed from the same number on the same day.
The number of calls in the column is a link. Clicking it will open all calls related to the dialed number.
- Recording: If a recording is available for the call, click
 to open the Recording tab.
User Calls Data Columns
- User: Name and phone line of the user who made or received the call.
- Phone Number: The phone number dialed by the user or the phone number of an external caller who dialed the user.
- Arrived From/To: Where the call originated from before it was received by the user, or where the call arrived if dialled by the user.
- Ring Duration: The duration the call rang before it was answered or rejected.
- Talk Duration: The actual talk duration for the call once it was picked up.
- Transferred: What kind of transfer was performed on the call – "Blind" or "Smart Transfer" (The difference between the two is explained in the TeleConosole call options.) The field is left empty if the call was not transferred.
- User On Call: For group calls (hunt groups or queue), indicate "Yes" when the user did not pick up a call because they were on another call. All other call scenarios are shown as "No".
Additional Account and User Calls AI Insights Columns
These KPIs will be available only if the AI metrics feature is enabled for the account. AI Insights and call transcripts can be viewed in the call's details. Administrators and users cannot change data for these columns.
- Call Purpose: The intent of the call as determined by the AI, based on categories defined in the AI Call Intelligence Prompts settings on the Account page, where you can add new Call Purpose categories or remove existing ones.
- Call Sentiment: The general tone of conversation between the caller and the agent – Negative, Neutral, or Positive.
- Customer Satisfaction: A score between 1 and 10, determined by the AI for how a customer feels about the handling of their call and issues.
- Agent Performance: A score between 1 and 10, determined by the AI for how an agent handled the customer call and issues.
- Action Required / Urgent Action Required: The AI will put a checkmark in these columns if it determines that additional action or urgent action is required (or not) is required for resolving or addressing the issue raised by the caller.
- Custom AI KPIs: If any Custom AI KPIs are defined in the AI Call Intelligence Prompts settings, they will be available for selection at the bottom of the Column Management list and are placed after the other AI Insights columns.

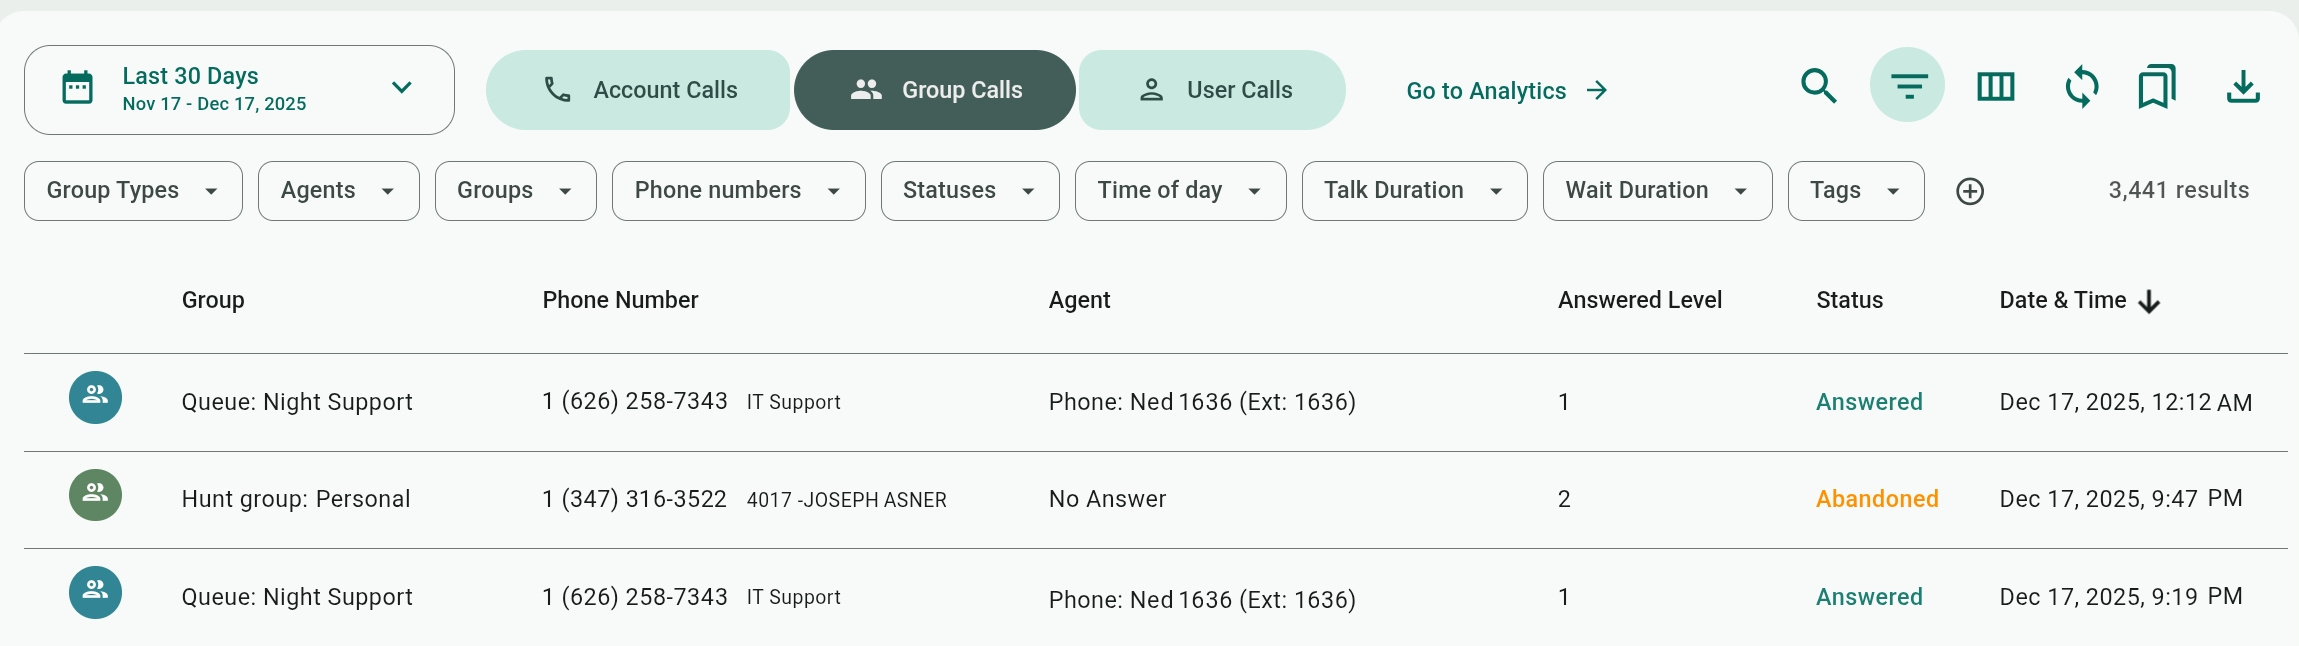
Group Calls Columns
- Group: The hunt group or queue the call was routed to.
- Phone number: The phone number of the caller.
- Agent: The agent who answered the call or "No Answer" if the caller abandoned the call or selected to exit the group.
- Answered Level: For queues, this column counts the number of agents the system rang and didn't answer. For hunt groups, this column counts the number of hunt group priority levels the system rang while searching for an available agent.
- Wait Time: How long the caller waited in the hunt group or queue before the call was answered.
- Talk Time: The conversation duration between the caller and the agent who answered his call.
- Request Callback: Calls where the caller requested to be called back by dialing *. The system notes the caller's number and provides it to agents. The caller can hang up and wait for an agent to become available to call them.
The callback option can be enabled or disabled for each queue under the queue's Call Settings.
Sorting Columns
You can sort the report by the values of any column, except those with phone numbers. Click a column to sort it in ascending order ( ) and click it again to sort it in descending order (
 ).
).
In the example shown here, the report is sorted by date and time. Note that if you sort by other columns, the system will also display the results, if possible, in chronological order.

Applying Filters
You can use one or several filters to narrow down and refine the report results. Account Calls and User Calls reports have the same filters, while the Group Calls report has a different set of filters. The Statuses filter appears in all three reports, but has different choices for Group Calls.
The filter toolbar can be shown or hidden with the  button. If the filter bar is hidden, the filter button is marked as
 when filters are applied to remind you that some report results are being filtered out.
Select  on the title of an active filter or Clear when opening the filter to clear your selections or remove all filters by selecting Clear all.
Active filters display the first item you selected, making them wider. On smaller screens, you may need to drag the filter toolbar or use its right or left arrows to see filters that were shifted off-screen.
Account Calls and User Calls Filters:
- Phone Numbers/Users/Extensions/Groups: Check the filter choices for which you want to see report results. For example, you can select two filters to show results for specific users in the sales queue.
The available Phone Numbers here are system phone numbers. To find phone numbers for outside callers, try sorting the report by the Caller ID column. - Directions: Select to show Incoming, Outgoing, or Internal calls.
- Statuses: Select to show calls that were Missed, Answered, or were delivered to the user as a Voicemail.
- Time of day: Use the two sliders or the Start/End drop-down menus to select an hourly range with 15-minute intervals.

- Duration: Use the two sliders or the Start/End drop-down menus to select a call duration range with 5-second intervals.

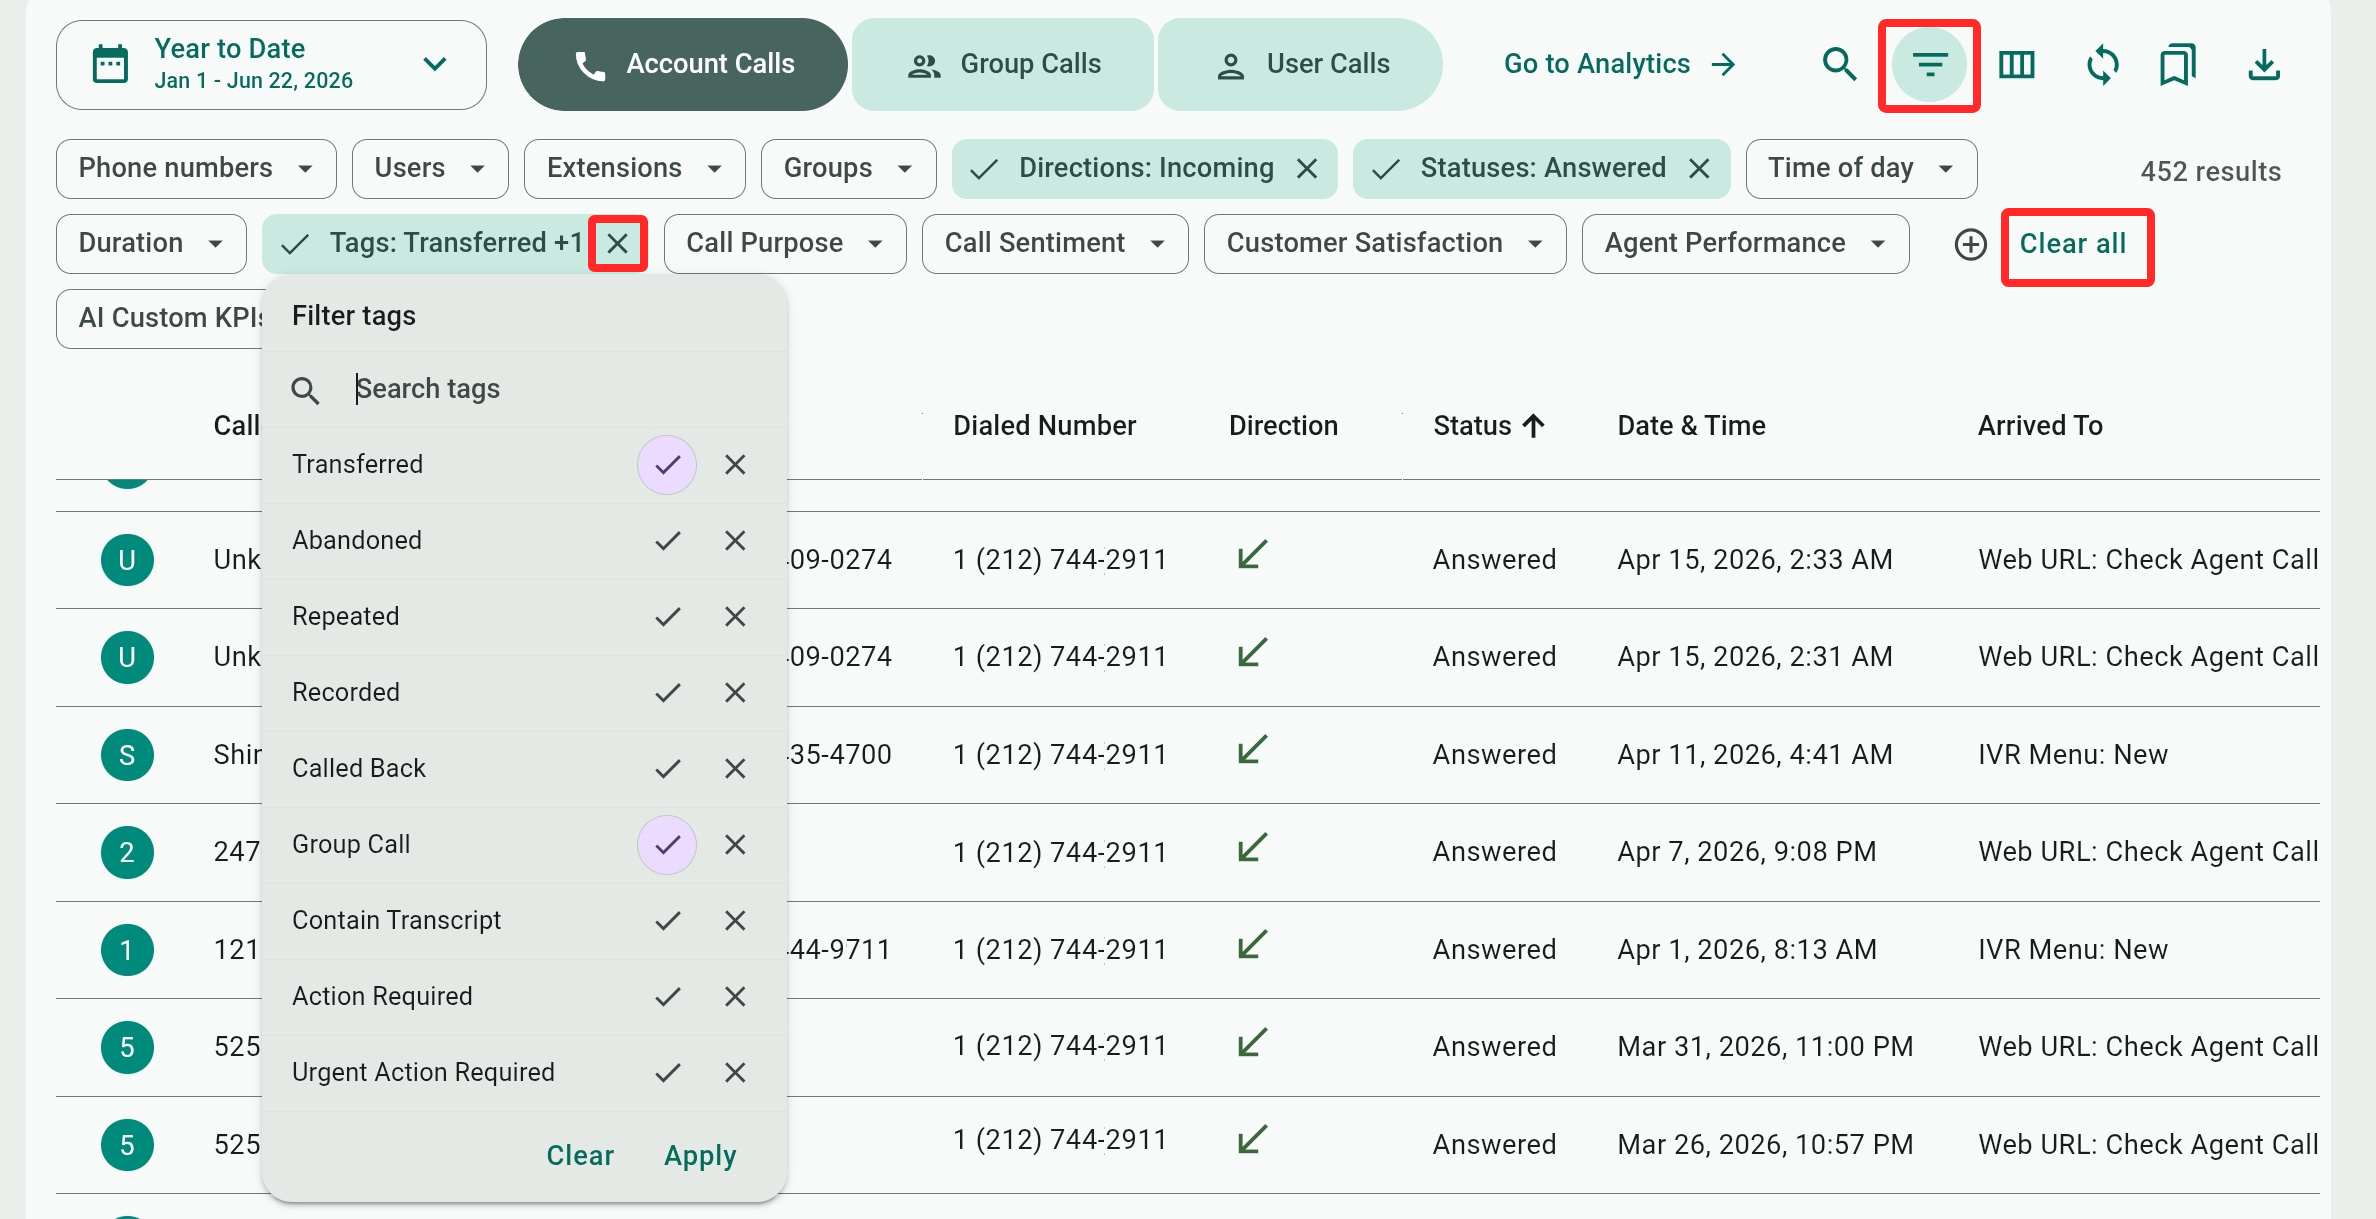
- Tags: Check tags to include them in the filtering, or select X to exclude them. In the example figure we have selected to show group calls that were transferred, and of the resulting list we exclude repeated calls.
 Transferred: Calls that were transferred by users or the call center administrator (using the Active Calls Switchboard or ACD Dashboard).
- Abandoned: Calls hung up by the caller while waiting in a queue, during an IVR greeting, etc.
Excluding the tag will show calls that were answered by an agent before the caller decided to hang up. - Repeated: Calls that were repeatedly dialed from the same number on the same day.
- Recorded: Calls that were recorded can be accessed and played in the call details tabs (see next).
- Called back/Not called back: Calls where a user or an agent responded to a call they missed or that was routed to their voicemail.
- Group call: Calls routed to agents from groups (hunt groups or queues). Excluding this will show calls that were routed directly to an agent.
- Contain Transcript: Automatic transcriptions are available on the Admin Center for voicemails (accessed from the Mailboxes screen ) and for phone calls. This tag refers to phone call transcriptions that can be viewed in the call details (see next).
- On Call (only applicable to User Calls): The "On Call" tag counts users who were already on another call when making or receiving a call. Excluding the tag will count users who were not busy with another call when making or receiving a call.
- Simultaneous Calls (only applicable to User Calls): The "Simultaneous Calls" tag shows all the users the system simultaneously rang but did not answer because someone else answered the call or the caller hung up.
The tag helps you differentiate between calls users actually missed (by declining or ignoring them) and calls that were not technically missed by users because another user picked up the call or the caller hung up.
It is useful to combine the tag with the Answered or Missed Status filter to better understand how the involved users handled the call.Exclude the tag to see users who were directly involved in a call, as it didn't ring any other users simultaneously.
- Callback Request (only applicable to Group Calls): Calls where the caller requested to be called back by dialing *. The system notes the caller's number and provides it to agents. The caller can hang up and wait for an agent to become available to call them.
- Action Required/Urgent Action Required (only applicable if AI metrics are enabled for the account): Calls where the AI determined that additional action or urgent action is required for resolving or addressing the issue raised by the caller.
- Day of month/Day of week/Month of year: Use the
 button (additional filters) to access these three filters and select days or months within the time range to show report results for.
Group Calls filters:
- Group Types: Select to show hunt groups, queues, or both (clearing the filter will also show both).
- Agents: Select which agent to show results for. The difference between the agents and users filters is that the Agents filter only lists users assigned to queues or hunt groups, while the Users filter lists all users on the system.
- Groups: Select which queues or hunt groups to show report results for.
- Statuses: Select to show calls that were Answered by an agent, Abandoned by the caller (the caller hung up), or an Exit status when the call was routed out of the group. Exiting a group can happen after the system tried to ring all group agents, under certain conditions (like too many calls holding), or when the caller dials *.
- Talk Duration: Use the two sliders or the Start/End drop-down menus to select a range for the duration agents talked with callers.
- Wait Duration: Use the two sliders or the Start/End drop-down menus to select a range for the duration callers waited for an agent to answer their call.
Time of day, Tags, and Additional Filters (Day of month/Day of week/Month of year) are the same as the Account Calls and User Calls.
Additional Account and User Calls AI Insights filters:
These will only be shown if the AI Insights feature is enabled for the account. Full AI Insights are shown in the call's details.
- Call Purpose: The general intent of the call as determined by the AI. Unlike other filters, there aren't any pre-defined values to choose from. Instead, the choices are generated and added from call transcripts analyzed by the AI.
- Call Sentiment: The general tone of conversation between the caller and the agent – Negative, Neutral, or Positive.
- Customer Satisfaction: Use the two sliders or the Start/End menus to select a value from 1-10.

- Agent Performance: Use the two sliders or the Start/End menus to select a value from 1-10.
- Action Required/Urgent Action Required: See these under the Tags filters.
- Custom AI KPIs: You can select to show calls that have any applicable Custom AI KPIs (remember to have all the relevant AI KPIs checked in the data column menu).
Custom AI KPIs are defined in the AI Call Intelligence Prompts settings.
Call Details
Select any call history record to show its details with two tabs – Call Journey and Recordings.
The AI Insights and Transcript tabs will also show if the AI metrics feature is enabled for your account, and if the call had some sort of verbal audio or conversation that can be transcribed and analyzed.
The  button lets you copy the web link for the call details so you can share it with another user (the user needs to have a role that allows them to view reports. Roles can be defined under Admin Center Menu>Account>Settings>User Roles & Privileges).
Use  to print the call journey or save it as a PDF file.
You can move to the next or previous call with the arrow buttons ( ).
).
Call Journey
The call Journey tab shows how a call was routed through the phone system, including the duration for each destination and the time and date the call ended.

If the call was routed to a mailbox and a voicemail is available, you can click  to open an overlay audio player to listen to the voicemail (this is not to be confused with call recordings, which are discussed next, where the system records the entire conversation).
Recordings
When enabled, call recordings are saved for entire conversations and can be accessed from the Recordings tab. If a call was routed between users, several recordings may be available.
For playback, you can drag the playhead, use  and
and  to skip back and forth, or change the playback speed by clicking
  . You can also download an MP3 file of the recording with
  .
.
You can delete a recording with  . Telebroad does not charge for recording storage. The deletion function is offered as a privacy feature since recordings are accessible to all users with an Account Owner role.

Enabling Call Recordings
You can enable or disable a user's call recordings by going to Admin Center Menu>Users & Phones and expanding the Lines & Devices category. Select  to edit an existing line and open its settings. Expand the General Info settings and toggle on or off the Enable call recording setting.

AI Insights
The AI Insights panel shows information generated by AI analysis of the call's transcript.
AI insights (and transcripts) are displayed only if enabled on your account. This premium feature requires an additional per/line subscription beyond standard licenses. It can be enabled and applied to user lines from Account>AI Call Intelligence Settings.
While AI Insights are automatically generated, you can tweak the AI performance and output from the Account>AI Call Intelligence Prompts settings, where you can also create custom AI KPIs.
Click to share or export the call's AI Insights and transcript. For the Print Report and Download as PDF options, you select what to include. For the Email Summary option, both the insights and the call transcript are included and you just need to provide up to five email recipients.

At the top of the panel, you will see two tags that also appear as data columns and filters on the main Call History page. A Call Purpose summarizes the general intent of the call as determined by the AI. Call Sentiment is the general tone of conversation between the caller and the agent – Negative, Neutral, or Positive.
These are followed by a CALL SUMMARY and KEY POINTS, giving an overview of the call.
If the issue raised by the caller wasn't resolved or only partially resolved, the AI will provide ACTION DETAILS for follow-up on the issue. The call will also be marked with an Action Required/Urgent Action Required tag.
Agent Performance and Customer Satisfaction are verbally summarized by the AI and graded on a 1-10 scale.
AI Custom KPIs will be displayed if defined in the AI Call Intelligence Prompts settings. These are also verbally summarized by the AI and can be either graded on a 1-10 scale or have a True/False value.
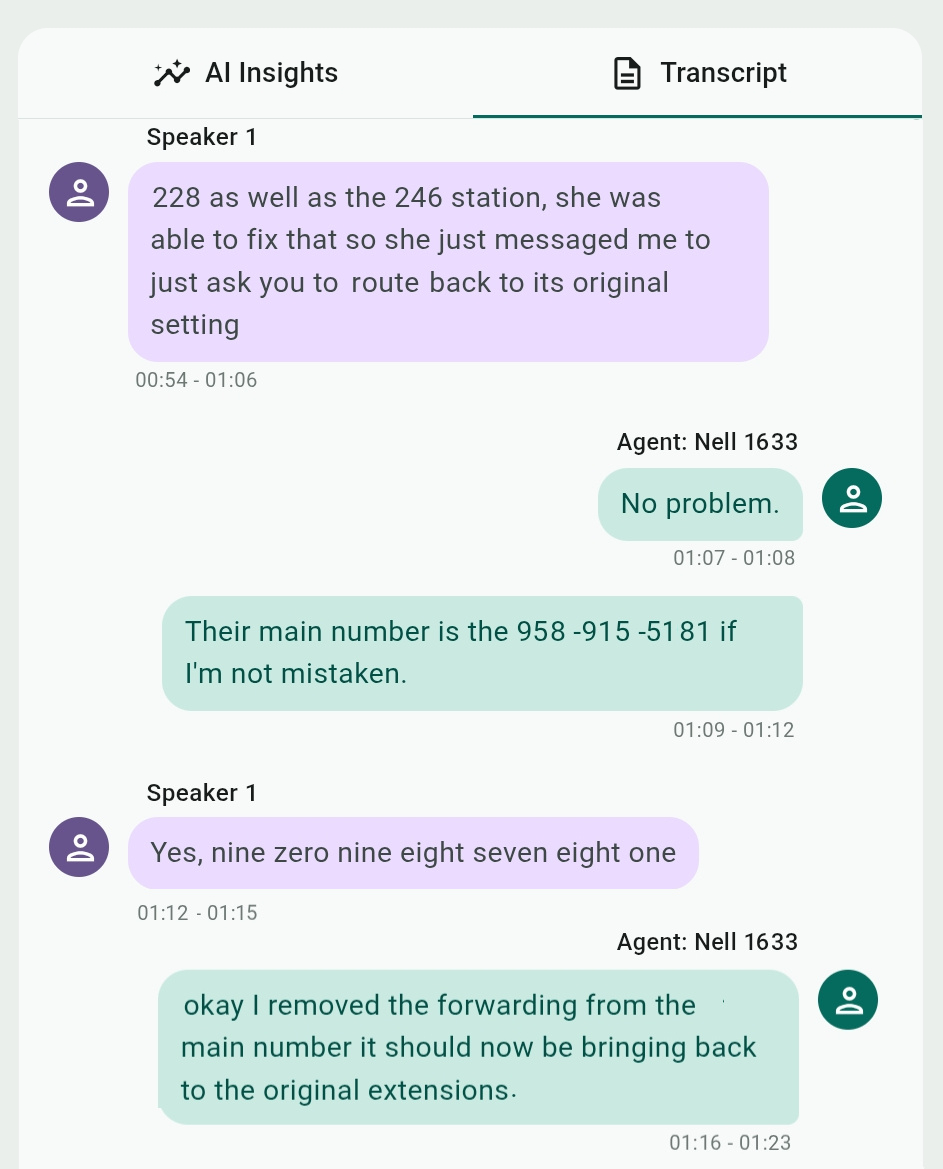
Transcript
Call transcripts are generated automatically by AI-optimized speech recognition. Like AI Insights, this needs to be separately enabled for your account by our support team for an additional monthly fee.
A timestamp range is shown below each speech bubble, in case you need to find its text in the call recording.
The Admin Center also has a voicemail transcripts feature, which can be activated from the Mailboxes page.